Reverse Engineer Guide For UTAR Students
Reverse Engineering Basics and Pre-Requisites
Before we learn how to reverse engineering, we need to have a few basic pre-requisites:
- Basic understanding of C programming language
- Knowing how to code in python
- Common sense
Reverse engineering is usually the process of taking a program that has been compiled and rewriting it in a way that is easier for humans to understand. In CTF, we study the program behavior and algorithms and get the flag based on our analysis.
First off, we need to understand the executable files, which are programs that are ready to run on a computer. Below will be the basics of how these executables are created and the common types you will encounter during CTF.
1. Creation of Executable Files
Executable files are created through a process called compilation and linking. Here is a simplified breakdown:
- Source Code: Programmers write code in high-level languages like C or Python.
- Compilation: The compiler translates this source code into assembly code.
- Assembly: The assembler then converts the assembly code into machine code, stored in object files.
- Linking: The linker combines these object files into a single executable file, adding necessary information about the environment in which the program will run.
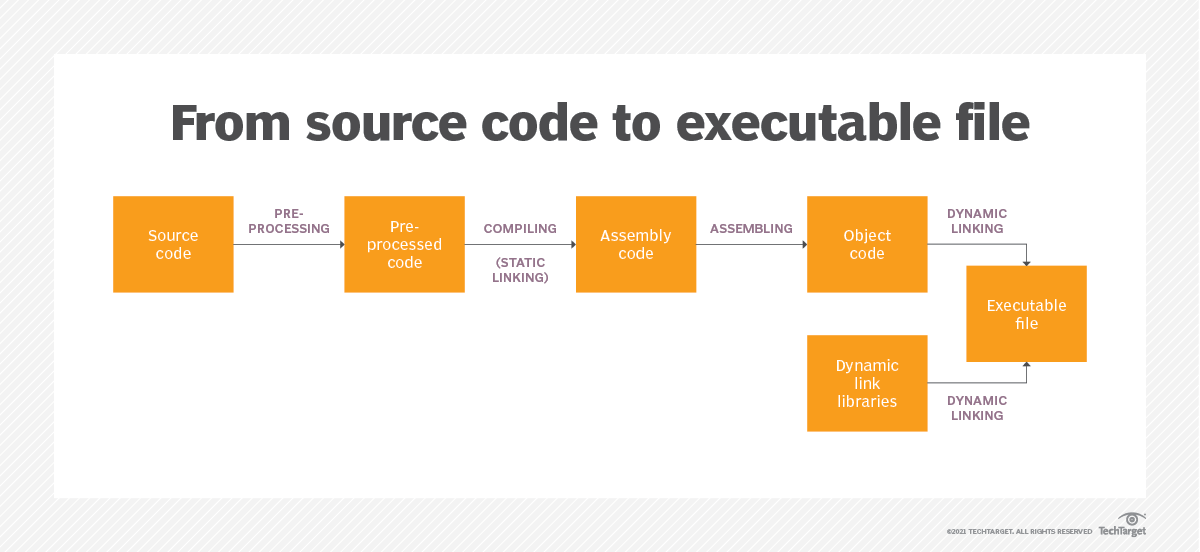 Flow of the creation of the executable file
During this process, some information, such as comments and certain labels are lost. Reverse engineering involves using knowledge and experience to recover some of this lost information.
2. Types of Executable Files
Different operating systems use different formats for executable files:
- PE (Portable Executable): Used by
Windows, contains headers, section tables, and tables for imports and exports (like those used in Dynamic Linker Library (DLLs)). - ELF (Executable and Linkable Format): Used by
Linux, includes headers, section data, and symbol tables.
Executable files are divided into sections, like .text for code and .data for data. These sections are mapped to memory segments based on permissions (read, write, execute). Performing an illegal operation like writing to a read-only segment causes a Segmentation Fault.
Common Assembly Instructions for CTF
When reverse engineering a program, you will often need to understand assembly language as machine code is directly generated from it. Here is a basic introduction to some key assembly concepts to help you get started.
1. Registers
Registers are small, fast storage areas within the CPU used to hold instructions, data or addresses temporarily. Understanding these is crucial because they play a significant role in how a program operates. The x86/x64 assembly instructions follow the following basic format: OP Code [operand 1] [operand 2]
In a typical 32-bit processor (like Intel’s IA-32 or x86 architecture), you will encounter several important registers:
- General Purpose Registers:
EAX, EBX, ECX, EDX, ESI, EDI - Stack Registers:
ESP (Top-of-Stack Pointer), EBP (Bottom-of-Stack Pointer) - Instruction Pointer:
EIP (holds the address of the next instruction to execute) - Segment Registers:
CS, DS, SS, ES, FS, GS
| General Purpose Registers | Name |
|---|---|
EAX | Accumulator |
EBX | Base |
ECX | Counter |
EDX | Data |
Here is a cheat sheet for x86 if you wish to understand more.
The flag register in a CPU is a special register where each bit represents a specific condition or result from an arithmetic or logical operation. These flags are used by the CPU to make decisions during program execution. Here are some commonly used flags:
- AF (Auxiliary Carry Flag): This flag is set to 1 when a carry occurs to the
third digitduring an arithmetic operation. - PF (Parity Flag): This flag is set to 1 if the number of 1s in the lowest byte of the result is even, and 0 if it is odd.
- SF (Sign Flag): This flag is set to 1 when the result of an operation is negative, indicated by the most significant bit (the sign bit) being 1.
- ZF (Zero Flag): This flag is set to 1 if the result of an operation is zero which indicates that the operation resulted in no value.
For 64-bit processors (x86-64), the E prefix in register names changes to R (e.g., EAX becomes RAX, EBX becomes RBX) and additional registers (R8 to R15) are introduced. Cheat sheet for x64 bit if you wish to learn more.
2. Common Instructions for CTF
Only a basic understanding is needed for beginners. No need to memorize, it all comes to practice. You can practice reversing assembly problems here.
| Type of command | OP Code | Examples | Results |
|---|---|---|---|
| Data transfer instructions | mov | mov rax, rbx | Copies the value of rbx into rax. |
mov qword ptr [rdi], rax | Stores the value of rax at the address pointed to by rdi. | ||
| Addressing instructions | lea | lea rax, [rsi] | Loads the effective address from rsi into rax. |
| Arithmetic instructions | add | add rax, rbx | Adds the value of rbx to rax. |
add qword ptr [rdi], rax | Adds the value of rax to the data at the address pointed to by rdi. | ||
sub | sub rax, rbx | Subtracts the value of rbx from rax. | |
| Logical operations instructions | and | and rax, rbx | Performs a bitwise AND operation between rax and rbx, storing the result in rax. |
xor | xor rax, rbx | Performs a bitwise XOR operation between rax and rbx, storing the result in rax. | |
| Function call instructions | call | call 0x401000 | Calls the function located at the address 0x401000. |
| Function return instructions | ret | ret | Returns from the current function. |
| Compare instructions | cmp | cmp rax, rbx | Compares rax and rbx, updating flags based on the result. |
| Unconditional jump command | jmp | jmp 0x401000 | Jumps to the instruction at address 0x401000. |
| Stack operation instructions | push | push rax | Pushes the value of rax onto the stack. |
pop | pop rax | Pops the top value from the stack into rax. |
| Conditional jump instructions | Explanation of the instructions | Usage | Flag condition |
|---|---|---|---|
jz/je | Jump if zero/equal | Jumps if a == b | ZF = 1 |
jnz/jne | Jump if not zero/equal | Jumps if a != b | ZF = 0 |
jb/jnae/jc | Jump if below/not above or equal/carry | Jumps if a < b, for unsigned numbers | CF = 1 |
ja/jnbe | Jump if above/not below or equal | Jumps if a > b, for unsigned numbers | |
jna/jbe | Jump if not above/below or equal | Jumps if a <= b, for unsigned numbers | |
jnc/jnb/jae | Jump if not carry/not below/above or equal | Jumps if a >= b, for unsigned numbers | CF = 0 |
jg/jnle | Jump if greater/not less or equal | Jumps if a > b, for signed numbers | |
jge/jnl | Jump if greater or equal/not less | Jumps if a >= b, for signed numbers | |
jl/jnge | Jump if less/not greater or equal | Jumps if a < b, for signed numbers | |
jle/jng | Jump if less or equal/not greater | Jumps if a <= b, for signed numbers | |
jo | Jump if overflow | Jumps if there is an overflow | OF = 1 |
js | Jump if signed | Jumps if the sign flag is set | SF = 1 |
Common Tools for CTF
The tools that are frequently used in reverse engineering are introduced in this section.
1. Ghidra and IDA
We will be using Ghidra for this guide. If you want to change to other tools like IDA, you can easily do so. Ghidra is a free, open-source reverse engineering tool developed by the NSA. It’s a strong alternative to IDA Pro, another popular but expensive reverse engineering tool. While Ghidra’s user interface might not be as polished as IDA Pro, it offers almost all of the same essential features. IDA Pro also has a free version, but it lacks many advanced features, making it less suitable for complex projects.
Ghidra and IDA Pro are both used to analyze compiled binaries from various programming languages and processor architectures. The main purpose of Ghidra is to decompile these binaries, turning them back into an approximate version of the source code. This is particularly useful for understanding the logic of the program. While it excels at decompiling into C and C++ code, Ghidra can handle binaries from other languages as well. Additionally, Ghidra can disassemble binaries, converting machine code back into assembly language.
Ghidra offers a wide range of features, including disassembly, decompilation, graphing, and scripting. These tools help researchers analyze software behavior, identify vulnerabilities, and detect malicious activities, all without needing access to the original source code. Its interactive and customizable interface makes it a powerful tool for in-depth software analysis.
2. OllyDbg & x64dbg
OllyDbg is a good debugger for Windows 32-bit as its extensibility is a powerful feature. Unfortunately, OllyDbg is no longer compatible with 64-bit, therefore a lot of users have shifted to x64dbg.
3. GNU Debugger (GDB)
GDB (GNU Debugger) is a command-line tool used for debugging programs. It offers powerful features, including the ability to perform source-level debugging for programs that include debug symbols, which make it easier to understand and fix issues in the code. GDB can be extended with additional functionality through Python-based extensions like gdb-peda, pef, and pwndbg which enhance its capabilities and make debugging more efficient.
4. dnSpy
Reversing Technique - Static Analysis
Static analysis is a fundamental reverse engineering technique that involves examining a binary file without actually running it. Instead, you analyze the binary’s machine instructions and other information directly. This method allows you to understand how the program works, identify potential vulnerabilities, and gather insights without executing any code. In this section, we will be introducing the usual methods to solve reverse engineering challenges based on Ghidra.
1. Introduction to the Usage of Ghidra
Ghidra should come pre-installed in your Kali Linux. If it is not installed, please follow this link and follow the steps to install it.
To run Ghidra, simply type ghidra on your terminal. After that, the application will show up.
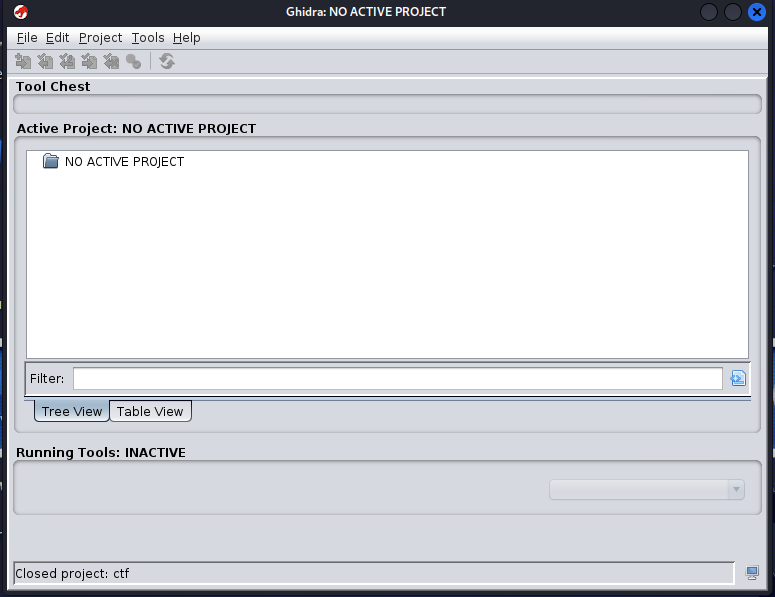 Ghidra Project Window
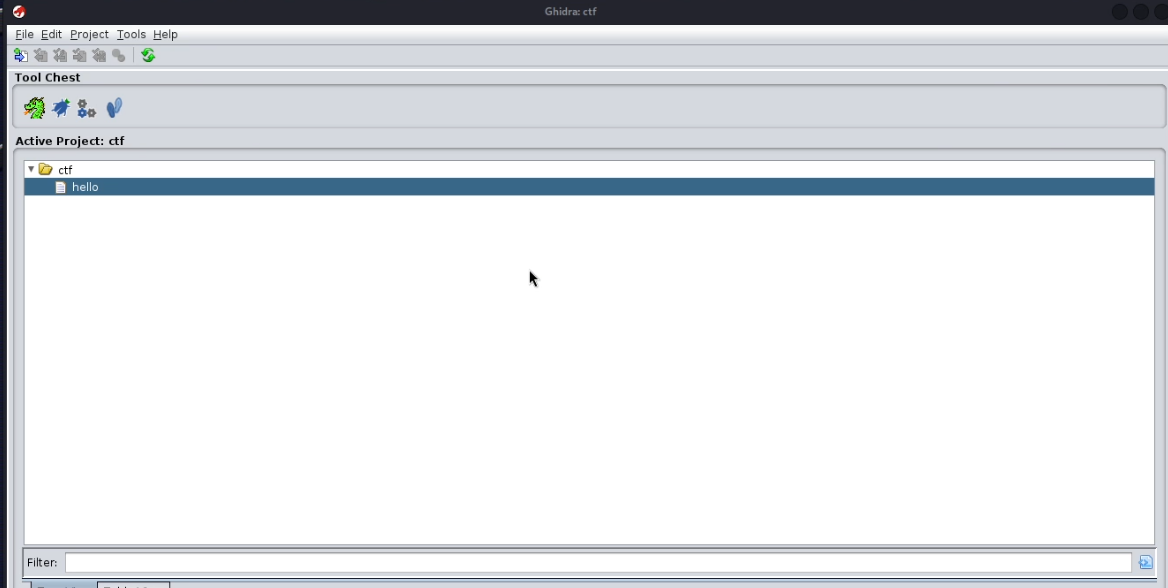
To create a project and start to import ELF or exe files, follow the steps below:
- Click on
FilethenNew Projecton thetop leftcorner of the application - Click on
Non-Shared Projectthen clickNext - Enter a project name, then click
Finish
You have successfully created a project.
For this part, you can follow along if you want. Open a text editor in your Kali Linux. If you have not install a text editor in your Kali, please do so. In this guide, we will be using Sublime Text, you are free to use Visual Studio Code or any other application, it does not matter. Next, we will code a simple program and import it into Ghidra and then compare the decompiled code with original source code.
1
2
3
4
5
6
7
8
9
10
11
12
13
14
15
16
#include <stdio.h>
#include <string.h>

int main() {
    char password[20];
    printf("Enter the password: ");
    scanf("%s", password);

    if (strcmp(password, "s3cr3t_p@ss") == 0) {
        printf("Correct!\n");
    } else {
        printf("Wrong!\n");
    }

    return 0;
}
Copy the code into your text editor. Next, open a terminal in the location where you stored the source file and run the following command to compile it using gcc. It will produce an executable binary output file named hello.
1
gcc helloprogram.c -o hello -g -no-pie
When you run the program on the terminal ./hello, the program asked you to enter the password. Since you are the one who compiled the program, you know the password. But in CTF, the source code will NOT be provided, hence you need to figure it out in Ghidra.
In CTF, ALWAYS run file check on the binary given first, because it gives essential information on what kind of program you are dealing with.
1
2
└─$ file hello
hello: ELF 64-bit LSB executable, x86-64, version 1 (SYSV), dynamically linked, interpreter /lib64/ld-linux-x86-64.so.2, BuildID[sha1]=839512af4378c4c8d2a2ccd564919948e24b3742, for GNU/Linux 3.2.0, with debug_info, not stripped
The most important part will be the ELF 64-bit LSB executable, which shows that it is a x64 binary program and also it shows that it is not stripped, which means it is easier to reverse the program.
Now to import the files that you want to reverse, or in this case, the hello program:
- Click on
FilethenImport File - Select the files that you want to reverse
- Click
Ok - On
Import Result Summary, clickOk - Double click on the file that you just uploaded
- Click on
Yesto analyze the file
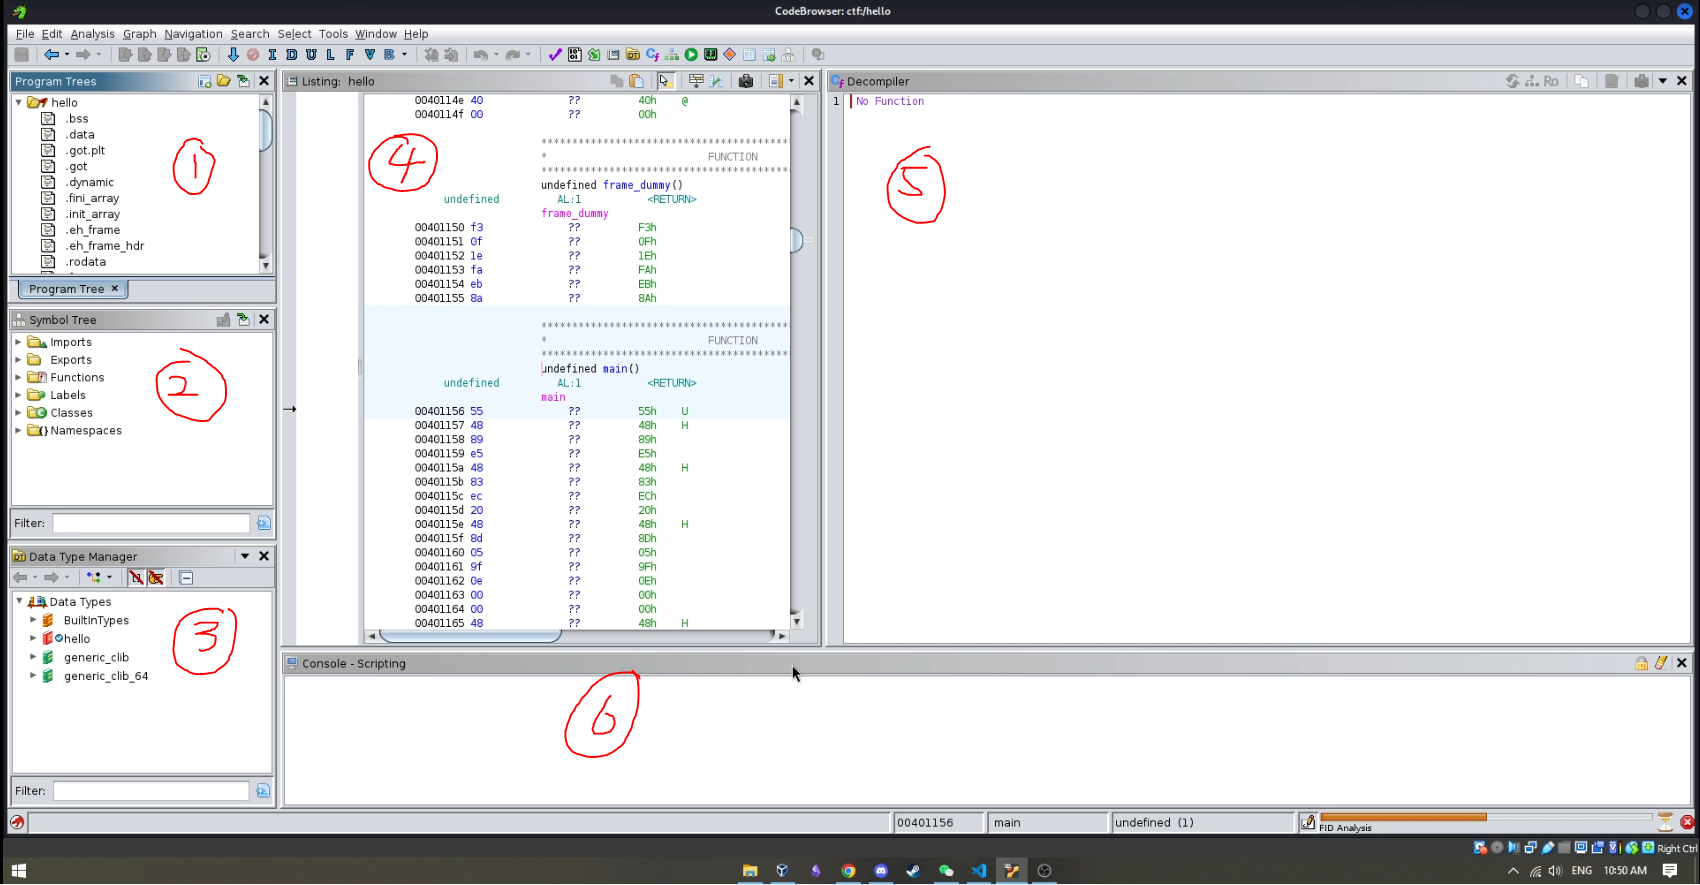
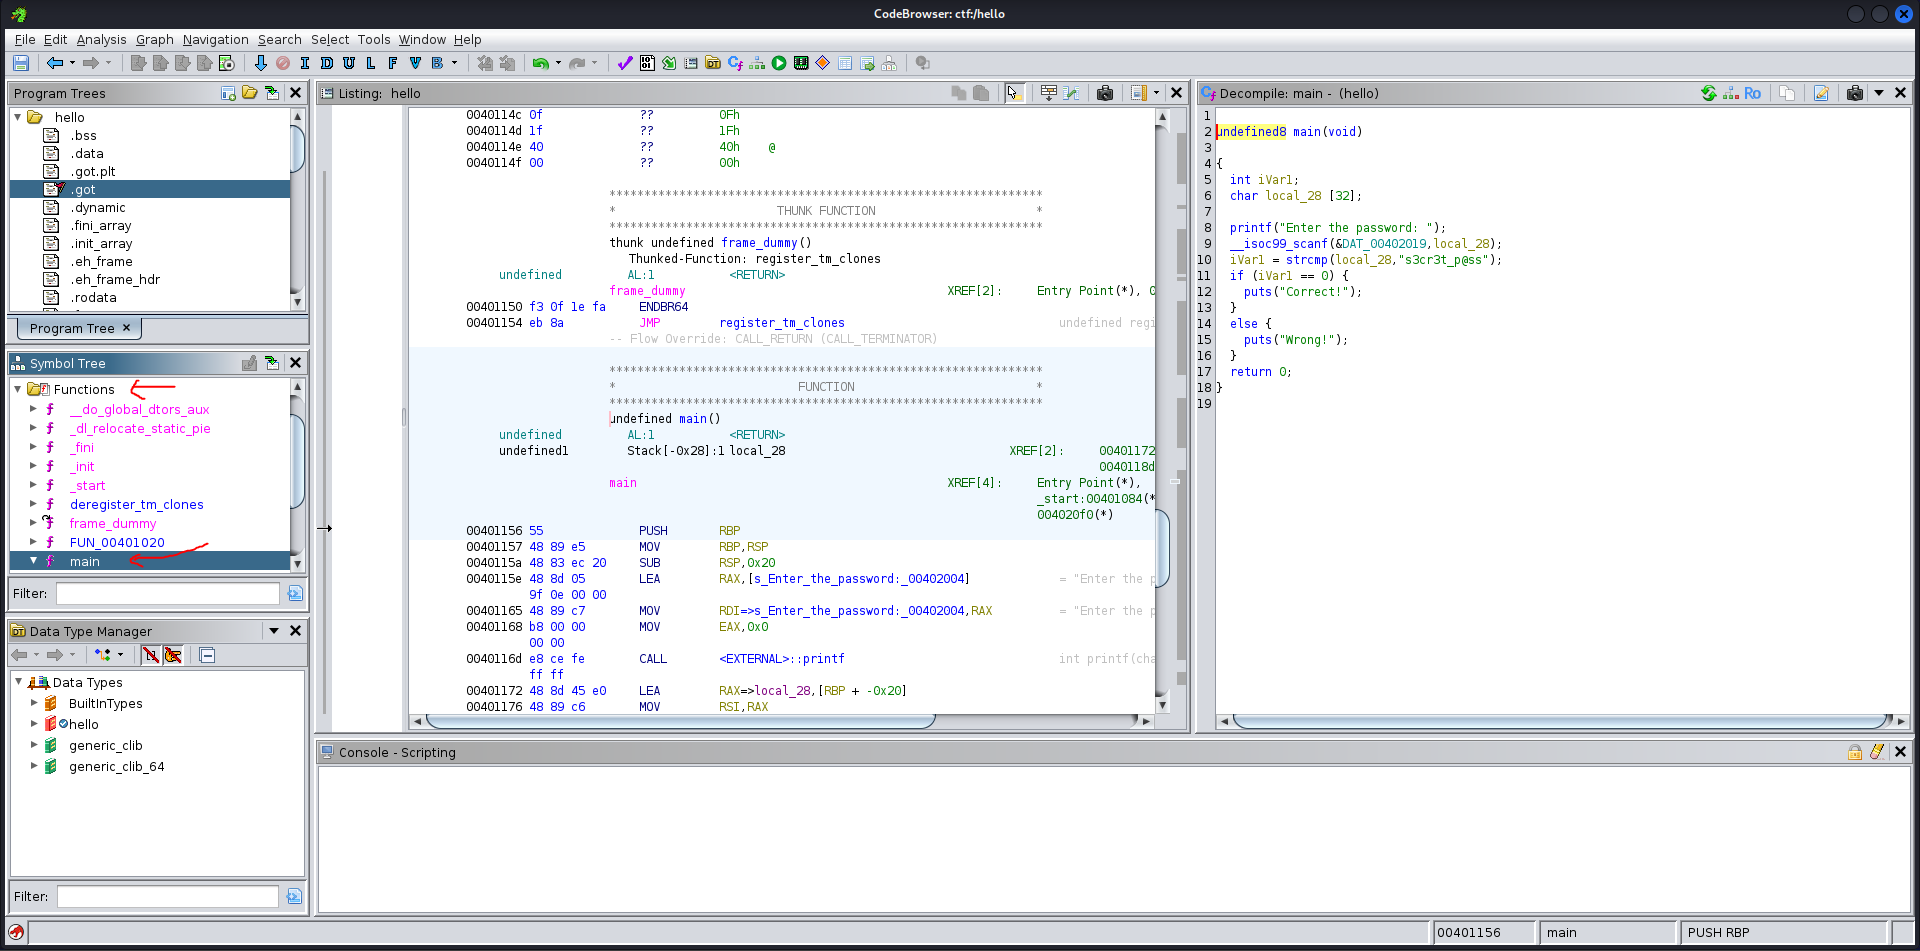
The interface (CodeBrowser) shown is divided into multiple sections, each of which is explained below:
TLDR: Focus on 2, 4 and 5.
- Program Tree: Allows a program to be organized into a hierarchy of folders and fragments. This part contains the
memory mapwhich allows you to jump to different parts of memory. For now,don't worry about this. - Symbol Tree: This is very
important. It contains all the functions that have been written by the author. - Data Type Manager: Allows users to locate, organize, and apply data types to a program. Read more here. Also,
don't worry about thisfor now. - Disassembly Window: This is also
important. It shows the disassembly for the binary. This is also why you need to have a basic understanding ofAssemblylanguage. - Decompiler: This is very
important. It shows thedecompiledview of any functions found in the binary that it has detected. It would be empty at first since no function would be chosen. In short, this is wheredecompiled pseudo-C code lives. - Console: As its name suggest, it is a
consolewindow. For now,don't worry about this.
Now, to reverse the program, click on Functions in the Symbol Tree. Tips for CTF, always look for the main function first, as it contains the main logic of the program. In case there is no main function, look for entry function. This happen is because it is a stripped binary. In this case, it is a not stripped binary as mentioned above.
Side Note: The difference in symbol tree between stripped and not stripped binary.
TLDR:
- Not stripped: program is
easierto read and reverse - Stripped: program is
harderto read and reverse
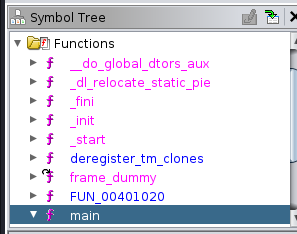 Not Stripped Symbol Tree
 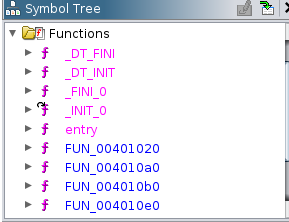 Stripped Symbol Tree
Anyway, back to reversing the program. As we can see, after pressing the main function in the Symbol Tree, the Decompiler shows us the pseudo-code for the program that we just wrote.
To make it even more readable, we can also rename some of the variables or functions that we know. We can do this by clicking a variable and type l on the keyboard to rename it whatever you like.
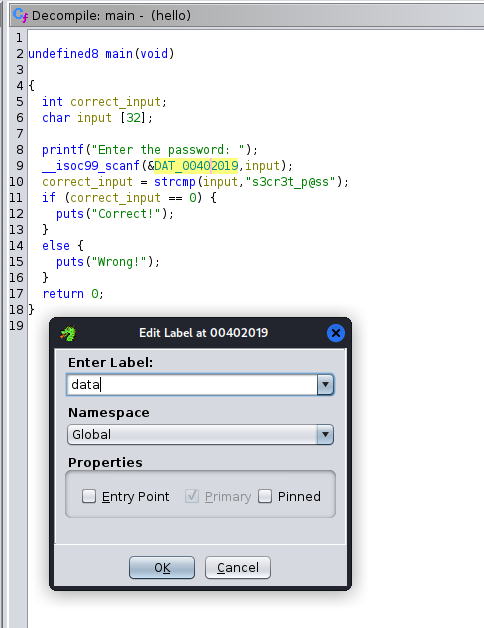 Renaming a variable or function
 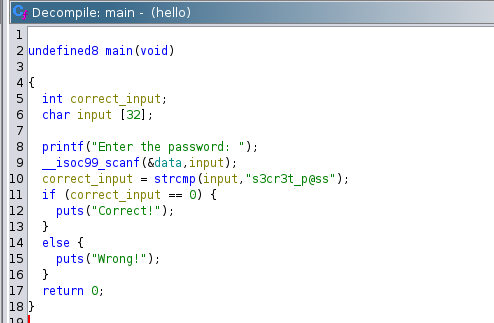 After renaming the variables
As we can see, it is so much more readable and easier to understand the logic of the program now. Now we know that the user prompts the user to enter a password, then it compares the input with s3cr3t_p@ss. If the input is correct, it shows correct otherwise it shows wrong. We can also double-check the password by running the program and input s3cr3t_p@ss.
1
2
3
└─$ ./hello
Enter the password: s3cr3t_p@ss
Correct!
And there we go, we have successfully figure out the password for the program. Of course, in CTF, it will not be this easy (unless you are playing beginner CTF). As CTF is becoming more and more popular in cybersecurity, the challenges will be getting harder and harder, even the challenges for local CTF are getting harder. But do not be discouraged, as you gradually continue to play, it will be easier and faster for you to reverse.
2. Common Code Recognition
Some developed algorithms show up a lot in CTF’s reverse engineering challenges. We can examine them considerably more quickly if we can recognize these algorithms. Table below show some of the examples:
| Encryption Algorithm | Pseudo-code | Description |
|---|---|---|
| RC4 | j = (i + 1) % 256;j = j + s[i]) % 256;swap(s[i], s[j]);t = (s[i] + s[j]) % 256; | Keystream generation |
| Base64 | b1 = c1 >> 2;b2 = ((c1 & 0x3) << 4) | (c2 >> 4);b3 = ((c2 & 0xF) << 2) | (c3 >> 6);b4 = c3 & 0x3F; | Converts 8-bit to 6-bit |
| MD5 | (X & Y) | (~X & Z)(X & Z) | (Y & ~Z)X ^ Y ^ ZY ^ (X | (~Z)) | F functions G functions H functions I functions |
| AES | x[j] = s[i][(j+i) % 4]4 cycless[i][j] = x[j]4 cyclesOverall 4 cycles | Includes ShiftRows operation |
| DES | L = RR = F(R, K) ^ L | Uses Feistel structure |
You may also read more on this topic here.