Forensic/Steganography Guide For UTAR Students
Forensics and Steganography Overview
Do note that this guide is intended for purely beginners in CTF. Hence, the contents will be simplified as to not chase beginners away from this category.
In digital forensics, experts investigate computers, phones, or other devices to find out what happened to the data. Maybe someone deleted important files, or maybe there is something hidden in the device. The goal is to recover, analyze and understand the data to solve a mystery.
In steganography, people hide secret messages or images inside regular files like pictures, videos, or even text files. To everyone else, it looks like an ordinary picture or file, but if you know where to look, you can find the hidden message.
In the context of CTF, Forensics include challenges like steganography, file format analysis, memory dump analysis, disk image analysis, network packet capture analysis and more. A forensics challenge is any task involving the analysis and processing of a hidden piece of data from static data files.
Common Tools Used
This section covers the common tools used to solve forensics / steganography challenges in CTF. It is recommended that you download all the tools before you proceed further. Also, do note that some tools (like Wireshark) are pre-installed when you downloaded Kali.
1. File/Image Analysis
- File Check
- Strings
- Exiftool
- Binwalk
- hexedit / xxd
- Gimp
- Steghide / Stegseek
- Zsteg
- Stegsolve
- Stegsnow
- zip2john
2. Disk Image Analysis
- Autopsy
- FTK Imager
- SleuthKit
3. Memory Dump Analysis
- Volatility3
4. Audio Analysis
- Sonic-Visualizer
- Audacity
5. Online Tools
6. Finding VBA Macros in Office Document
- Olevba (oletools)
7. Network Analysis
- Wireshark
- Cisco Packet Tracer (.pkt file)
8. Manually fixing QR code
9. PDF File Analysis
Understanding File Structures
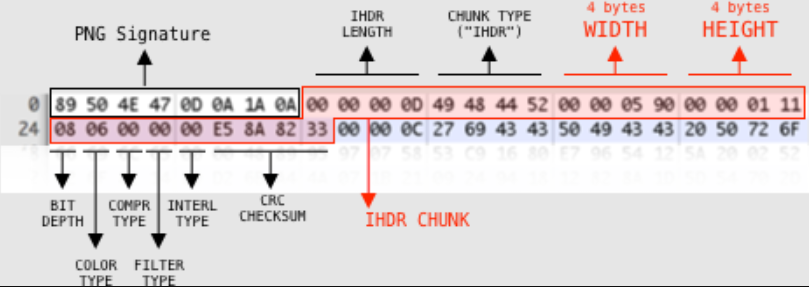
Most files, including images have a specific structure made up of various data blocks. For example, common image formats like PNG and JPG are composed of these standardized blocks. Understanding these structures can help you identify files, manipulate them, or even hide additional data within them.
For example, A PNG file has four key data blocks:
- IHDR (Image Header): Contains
basic informationabout the image (e.g. width, height) - PLTE (Palette Data): Stores the color palette, if the image uses one
- IDAT (Image Data): Contains the
actual image data - IEND (Image End): Marks the end of the file
Each of these blocks includes:
- Length: The size of the block
- Chunk Type Code: A code that identifies the type of block
- Chunk Data: The actual data contained in the block
- CRC (Cyclic Redundancy Check): Ensures the data hasn’t been corrupted
A PNG file always begins with a specific sequence of bytes: 89 50 4E 47 0D 0A 1A 0A, which helps identify it as a PNG file. The IEND block, which marks the file’s end, is always 49 45 4E 44 AE 42 60 82, and anything added after this block is usually ignored by standard image viewers.
 PNG File Specification
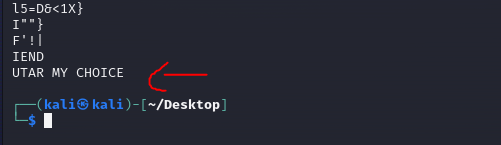
One interesting feature of the PNG file structure is that you can append additional data after the IEND block without affecting how the image appears. For example, you can add the text UTAR MY CHOICE or even entire other files at the end of a PNG file. When you open the image in a viewer, it looks the same, but the extra data remains hidden.
 Adding UTAR MY CHOICE at the end of the file
To detect and extract hidden files from an image, you can examine the file’s binary data for specific headers and footers associated with different file types. Here are some common file signatures that will appear in CTF:
| Image Files | Starts With | Ends With |
|---|---|---|
| JPEG (jpg) | FF D8 FF | FF D9 |
| PNG (png) | 89 50 4E 47 0D 0A 1A 0A | AE 42 60 82 |
| GIF (gif) | 47 49 46 38 | 00 3B |
| Archive Files | Starts With | Ends With |
| ZIP Archive (zip) | 50 4B 03 04 | 50 4B |
| RAR Archive (rar) | 52 61 72 21 | N/A |
| Audio Files | Starts With | Ends With |
| Wave (wav) | 57 41 56 45 | N/A |
| Video Files | Starts With | Ends With |
| AVI (avi) | 41 56 49 20 | N/A |
| MPEG (mpg) | 00 00 01 BA or 00 00 01 B3 | N/A |
| Multimedia Files | Starts With | Ends With |
| Quicktime (mov) | 6D 6F 6F 76 | N/A |
To know all the file signatures, you can find the list here.
Disk Image Forensics Introduction
In CTF, disk forensics challenges involve analyzing a disk image to uncover hidden data, usage traces or other clues left by a user. These challenges are designed to simulate real-world forensic work, requiring participants to dig through file systems, recover deleted files and piece together digital evidence.
Some of the key concepts in disk forensics include:
Disk Image: A disk image is a complete copy of the data on a storage device. It might be in a standard format like
.dd,.img, or.iso, or in a specialized format like VMware’s.vmdkor Encase’s.ewf.File System Analysis: Disk forensics often involves examining the file system, looking for traces of files or activities that might reveal clues or hidden data.
Usage Traces: These are digital footprints left by users, such as browser history, recently opened files or remnants of deleted data.
Deleted Files: Disk forensics tools can often recover files that have been deleted, as deleting a file typically just marks the space as available without immediately erasing the data.
Memory Dump Forensics Introduction
Memory forensics is the practice of analyzing a snapshot of a computer's memory to extract valuable information about the system’s state at a particular moment. This includes details about running processes, open network connections, loaded modules and sensitive data such as passwords or encryption keys.
In a CTF challenge, memory forensics might involve:
Analyzing Processes: Identifying which processes were running and looking for suspicious or hidden processes.
Dumping Process Memory: Extracting the memory contents of a particular process to search for strings, hidden files or encryption keys.
Network Activity: Analyzing network connections that were open at the time the memory was captured.
Finding Artifacts: Recovering artifacts such as browser history, command-line activity or user credentials.
Common Tools Usage
1. File/Image Analysis
Checking File Type
Once you downloaded the challenge file, ALWAYS perform FILE CHECK first. You can do this easily by typing file <filename> on your linux terminal to determine the file type. CTF challenge authors like to change the type of the file to lead you into a rabbit hole. Example shown below:
 Wrong File Type
As we can see, imagine the challenge file given to us is utar.wav. You would expect that it is a wav file, but there is no audio and you cannot open it on any audio software, hence you fall into a rabbit hole. But once we check the file type, we realized that it is actually a PNG image. So, we can fix it by typing mv utar.wav utar.png on your linux terminal.
Strings
This is a linux command where you can see hidden text inside a file. Usage below:
1
2
3
4
5
6
7
// strings command, -h to list out all the commands that you can do with strings
strings -h
strings <filename>
// remove gibberish
strings -n 10 <filename>
// finding a string
strings <filename> | grep "ctf"
 Strings output
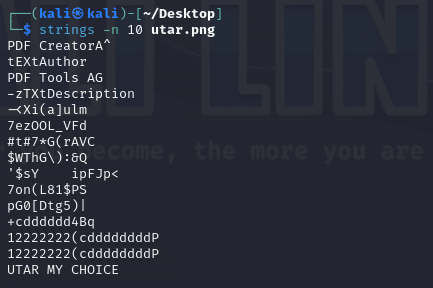 Strings -n 10 output
Here, we can see the hidden data UTAR MY CHOICE using strings as opposed to using hexedit or xxd to check. In summary, it is a faster way to solve.
Exiftool
EXIF (Exchangeable Image File Format) is a standard that stores additional information (metadata) within image files, such as JPEG, TIFF, or RIFF. When you take a photo with a digital camera or smartphone, EXIF data is automatically generated and embedded in the image file. This metadata can include a variety of details about the photo and the device used to capture it.
In short, EXIF data can be crucial for understanding when and where a photo was taken, what device was used, and whether the image has been edited.
To use exiftool, type the following into the terminal:
1
exiftool <filename>
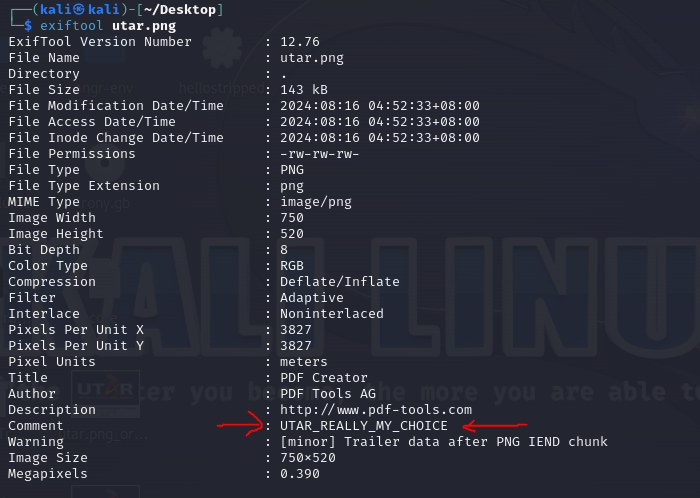 Image with interesting comment
Binwalk
In case you have not install binwalk, type the command below on your linux terminal.
1
sudo apt install binwalk
Binwalk is a powerful tool often used in CTF challenges to help with forensics and steganography tasks. Here is how it works:
- Binwalk is an open-source tool designed for analyzing and extracting data from images. However, it can also be used to examine other types of files to find embedded data.
- In CTF challenges, Binwalk is frequently used to scan files (like images) for
hidden data. For example, if someonehides a ZIP fileinside a PNG image, Binwalk can detect and extract that ZIP file.
To use binwalk, type the following into the terminal:
1
2
// Show all the options that you can do with binwalk
binwalk -h
To scan a file using binwalk and it will display any embedded files or data found within:
1
binwalk <filename>
 Normal Picture
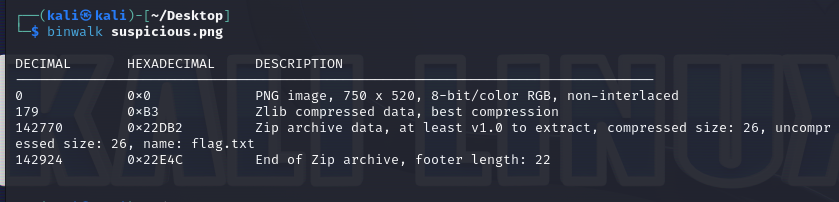 Picture with hidden data inside
To extract hidden files using binwalk:
1
binwalk -e <filename>
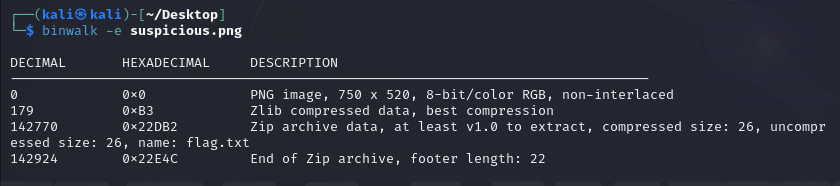 Extracting hidden files
 Output of the flag
hexedit / xxd
When working with corrupted or manipulated files in Capture the Flag (CTF) challenges, tools like hexedit and xxd are incredibly useful. These tools allow you to view and edit the raw hexadecimal data of a file, which can help you identify and repair issues, such as fixing a broken file or image.
- hexedit: A command-line tool that lets you view and edit the binary content of a file directly in a hex editor interface.
- xxd: Another command-line tool that can create a hex dump of a file or convert a hex dump back into binary data. It’s often used for viewing, but it can also be used for editing by converting the hex back into a file.
It does not matter which one you use, pick one that you prefer.
For example, given a PNG image, but we are unable to view its content.
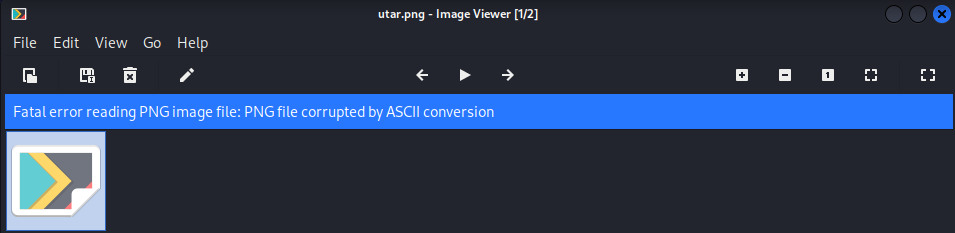 File error
To use hexedit, type the following:
1
hexedit <filename>
 PNG Signature error
As we know from understanding the basics of file structure, we can see that the signature is wrong. Change it to 89 50 4E 47 0D 0A 1A 0A and press Ctrl + X, then Y to save it.
 After fixing the file
GIMP
You can skip this part if you prefer to use professional tools such as Adobe Photoshop. In case you have not install GIMP, type the command below on your linux terminal.
1
sudo apt-get install gimp
In short, GIMP is an open-source (free) image editing software that can be used for various tasks including basic photo editing, graphic design and more.
To open GIMP, you can type the following into the terminal:
1
gimp <filename>
Usually, use GIMP to solve challenges related .xcf file. The challenges might be an image and there are a lot of layers on the image and you need to remove the layers to solve the challenge. Example shown below:
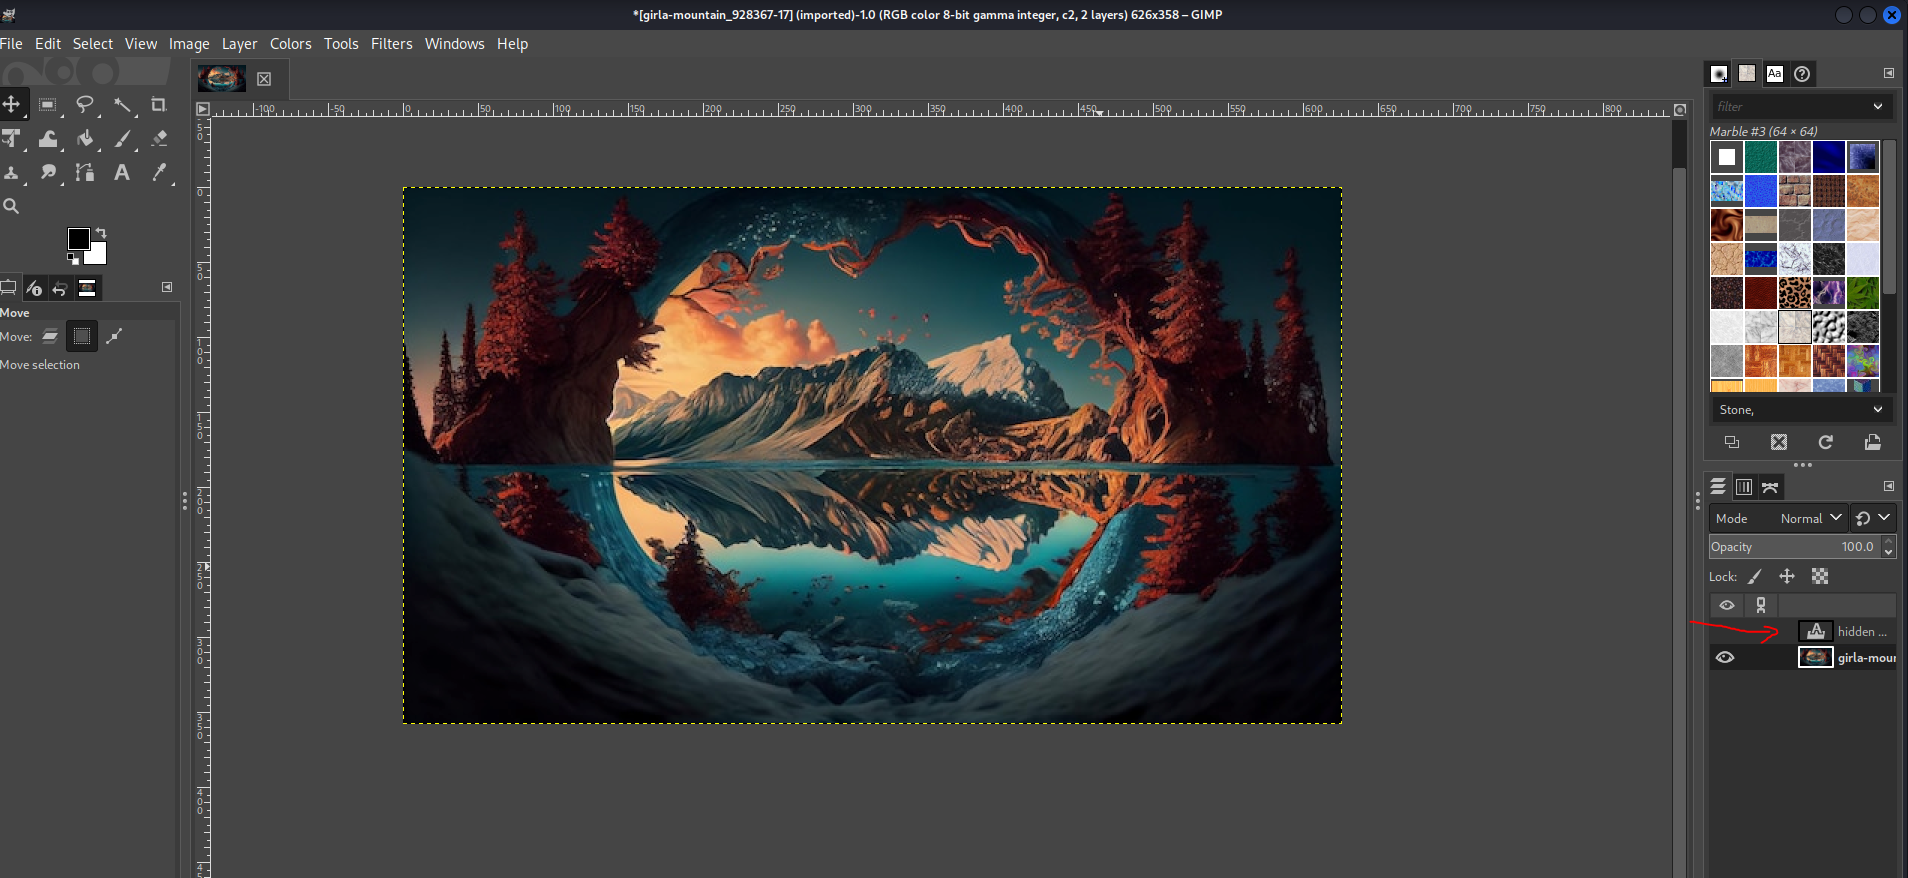 Normal image
 After making hidden message visible
Steghide / Stegseek
In case you have not installed steghide:
1
sudo apt-get install steghide
Download stegseek from this github.
In short, it is a command-line tool to hide and unhide data in a file, while stegseek is used to bruteforce the passphrase.
Do note that these tools only work for JPG image.
Example usage:
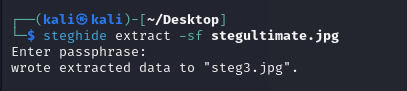
If it asked for a passphrase, try to press Enter on your keyboard to see whether the author got use the passphrase on the image or not. If a passphrase is required, you may try to use stegseek with rockyou.txt to solve it. Otherwise, you need to look at other places in the challenge to get the passphrase.
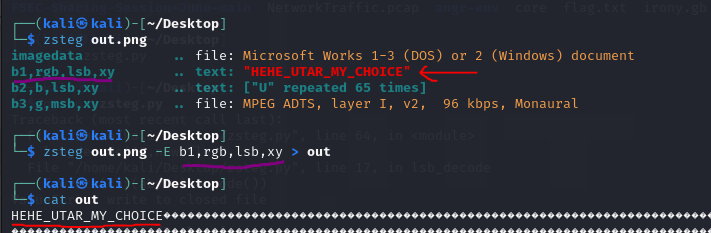
Zsteg
In case you have not install it:
1
gem install zsteg
Before we talk about this tool, we need to learn about LSB. In short, LSB (Least Significant Bit) is a technique used to hide data within the pixels of an image specifically in PNG files. It takes advantage of the fact that small changes in a pixel’s color values are typically undetectable to the human eye.
In most PNG images, each pixel is composed of three primary colors, aka RGB:
- R (Red)
- G (Green)
- B (Blue)
Each color channel (R, G, and B) is represented by 8 bits of data, meaning the color value can range from 0x00 (0 in decimal) to 0xFF (255 in decimal). Some images may also include an A (Alpha) channel for transparency, but the principle remains the same.
In LSB, you modify the least significant bit of each color channel in a pixel. Because this bit represents such a small change in color, it is usually imperceptible to the human eye. By changing the LSB, you can encode information within the image.
After knowing a bit of LSB, we can use the tool to solve some challenges:
1
2
3
4
// Common Usage
zsteg <filename>
// Extracting output
zsteg <filename> -E b1,rgb,lsb,xy > <output_filename>
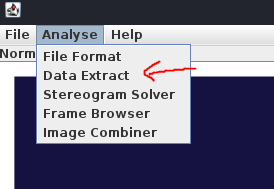
Stegsolve
In case you have not install it:
1
2
3
4
wget http://www.caesum.com/handbook/Stegsolve.jar -O stegsolve.jar
chmod +x stegsolve.jar
mkdir bin
mv stegsolve.jar bin/
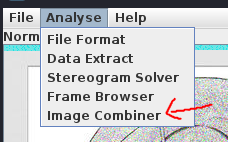
This tool is similar to zsteg except that Stegsolve has more functions. It allows you to analyse file format, extract data (which is similar to zsteg), stereogram solver, frame browser and image combiner (perform operations like XOR between images).
Tool usage:
1
java -jar stegsolve.jar
Firstly, load the image that you want to analyze into the application. Next, click on Analyze and then Data Extract to explore about its functionality.
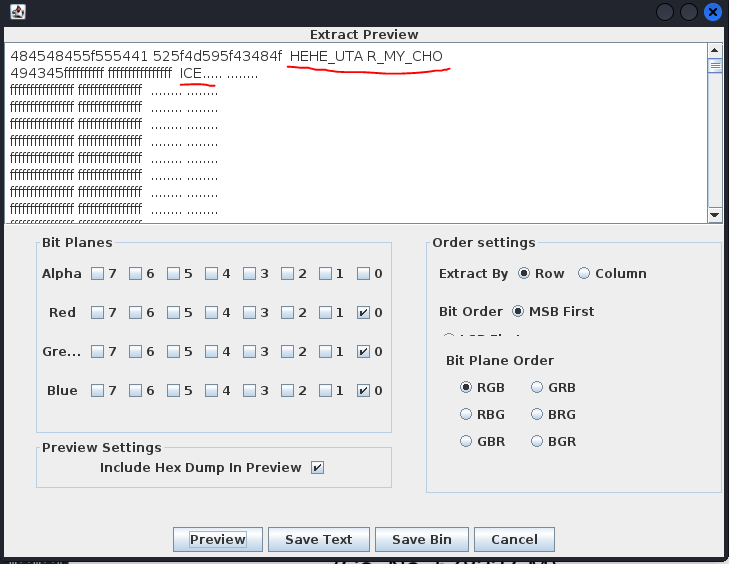
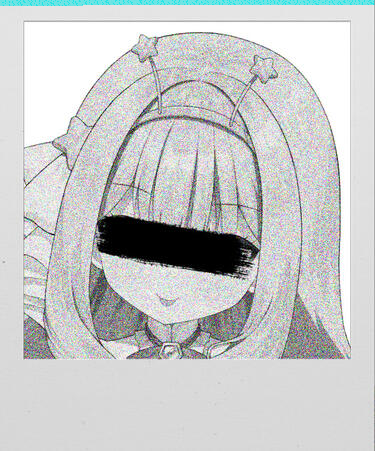
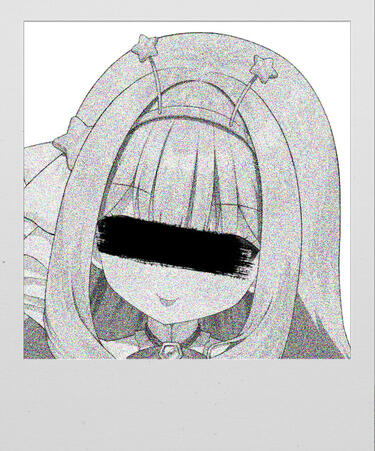
As we can see from the image above, we can see the extracted data. Lets look at another example, and this challenge is taken from JellyCTF.
1) Image1 (click on the link to view the image)
2) Image2 (click on the link to view the image)
As mentioned previously, stegsolve allows us to perform XOR operations between images by utilizing the image combiner function. So, we combine Image1 and Image2 to see the hidden data.
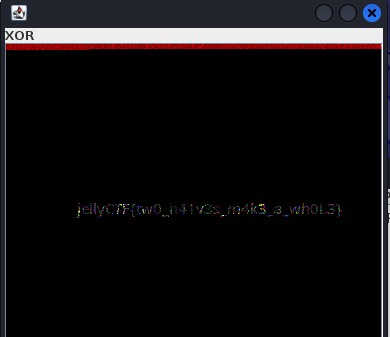
As we can see, the hidden data is jellyCTF{tw0_h41v3s_m4k3_a_wh0L3}.
Stegsnow
In case you have not install it:
1
sudo apt-get install stegsnow
Stegsnow is a tool for hiding and extracting messages within text files or ASCII-based formats. It utilizes whitespace (spaces and tabs) at the end of lines to hide information.
Tool usage:
1
2
3
4
// find more functions
stegsnow -h
// decode the hidden message without password
stegsnow -C <filename>
Provided a suspicious text file, we can see that it is quite normal, but there are extra lines in the text file. So, we utilize stegsnow to decode the message.
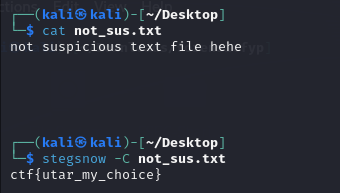 Decoded message
2. Disk Image Analysis
FTK Imager
In case you have not download it (note that it is on Windows):
For this section, FTK Imager will be the recommended software to use to solve the challenges. In CTF challenges, you might be provided with a disk image file (e.g. .dd, .img, .e01, .ad1 and more) and asked to find hidden data, recover files or analyze the file system.
Before you start analyzing the file, it is important to identify the file type first so that you use the right tool for it.
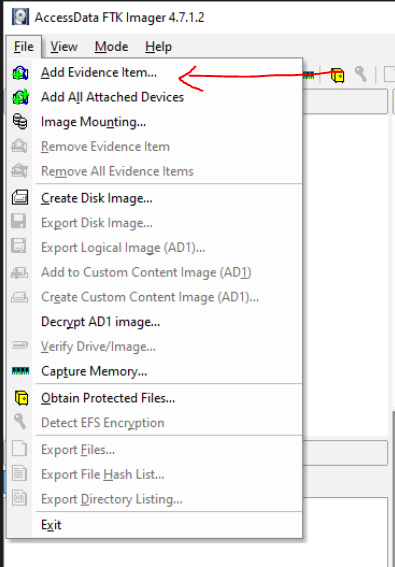
Let’s try to use this tool to solve one of the challenges from PicoCTF named Pitter, Patter, Platters.
Open FTK Imager, go to File then Add Evidence Item.
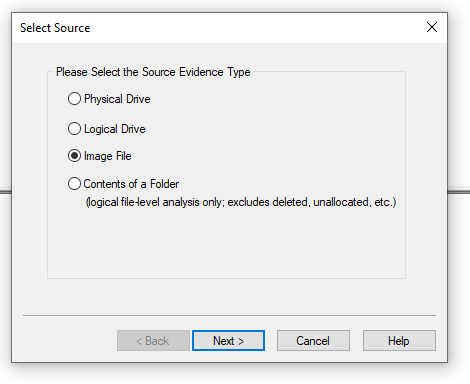
After that, select an appropriate source. Usually for CTF, it will be image file.
Select the file that you want to analyze.

Once loaded, you can browse the file system, view files and inspect the metadata by navigating through the file structure within FTK Imager to find suspicious files or directories.
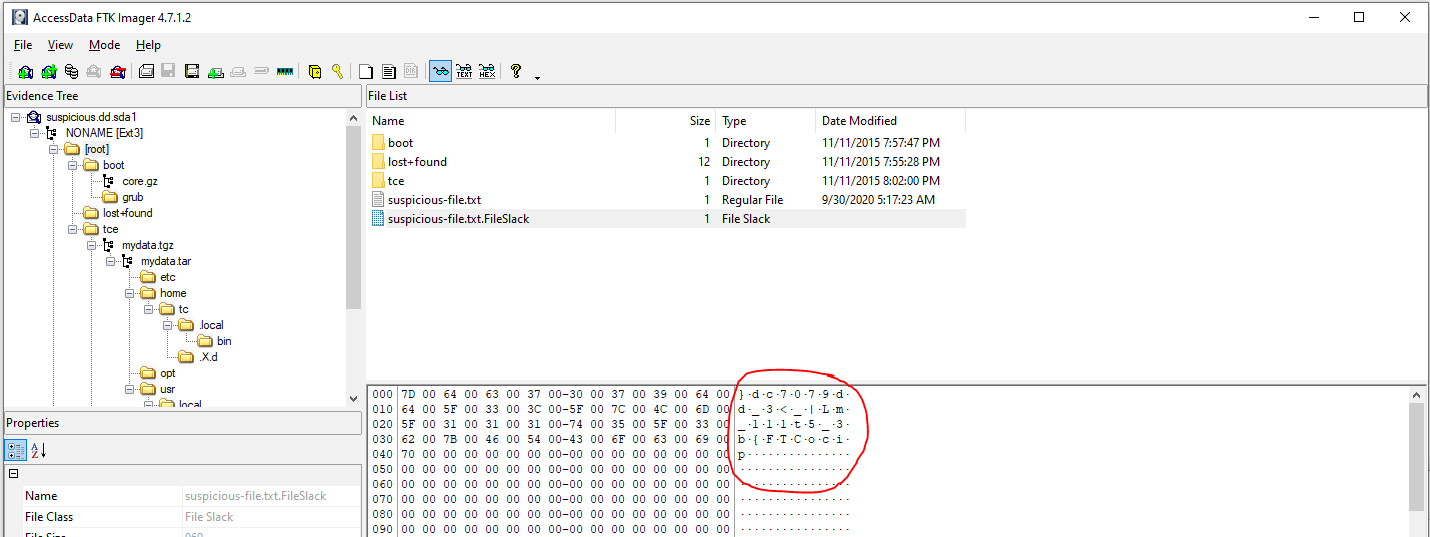
In this example, the suspicious file that will give the flag is suspicious-file.txt.FileSlack. It shows }61d907ec_3<_|Lm_111t5_3b{FTCocip but if you reverse it, it shows the true flag which is picoCTF{b3_5t111_mL|_<3_ce709d16}.
Some challenges in disk image forensics focus on the distinctive features of specific file systems. For example, these challenges may include inode recovery in the EXT series, FAT table recovery in the FAT series, understanding snapshot properties in the APFS (Apple File System) file system and examining nanosecond timestamp features. When facing obstacles in file analysis, it can be beneficial to explore the attributes of the file system to identify potential solutions.
There is a much faster way to solve this kind of challenge by using the power strings and grep command. This is what we called as an unintended solution. Hence, do not worry if you cannot find the flag straight up using strings.
1
2
3
// grep "flag format"
strings <filename> | grep "picoCTF{"
strings <filename> | grep "flag.txt"
3. Memory Dump Analysis
Volatility3
In case you have not installed it:
- Volatility3 Download Link
- Volatility2 Download Link if you want to download volatility2.
There is also volatility2, which is much older than volatility3. You can download volatility2 as well, but be careful that the packages on your linux might crash together. You might need to create a virtual environment to install it.
The differences is that volatility2 provide much more plugins and features such as checking google chrome history and more. However, it is much more slower as compared to volatility3.
Usually, volatility3 is sufficient for CTF challenges unless the challenge stated otherwise.
Here are some of the good resources and writeups that you can refer to:
- Cheatsheet
- https://www.hackthebox.com/blog/memory-forensics-volatility-write-up
- https://medium.com/@i227446/dumpme-blue-team-ctf-memory-forensics-writeup-cyber-defenders-cf4fb09187ec
- https://csilinux.com/unlocking-windows-memory-with-volatility3/
- GIMP with Volatility
4. Audio Analysis
Sonic-Visualizer
In case you have not install it:
1
sudo apt-get install sonic-visualiser
Sonic Visualiser is an open-source application used for viewing and analyzing the contents of audio files. In CTF, Sonic Visualiser can be used to analyze audio files to uncover hidden messages, decode data embedded in sound waves or visualize audio patterns. It supports a range of audio file formats, including WAV, MP3, FLAC, and OGG.
Tool usage:
1
sonic-visualiser <filename>
Next, press the play button to listen to the audio. This can give you a sense of what the audio contains, but hidden data might not be immediately noticeable by just listening. Let’s say that what you heard is a morse code, you can go to this website and put the audio file to this website.
By default, Sonic Visualiser displays the waveform of the audio file. This visualization shows the amplitude of the sound over time. The waveform can help you identify any unusual patterns or anomalies that might indicate hidden data or encoded messages.
You can also zoom in/out to get a closer look at specific sections of the waveform. This is useful if you suspect that the hidden data is embedded in a specific part of the audio.
Finally, the most common one is Spectrogram Analysis. A spectrogram displays the frequency content of the audio over time with different colors representing different intensities.
Here is an example challenge from riftCTF:
Load the audio file to Sonic-Visualiser. When you play the sound, nothing sounds suspicious. 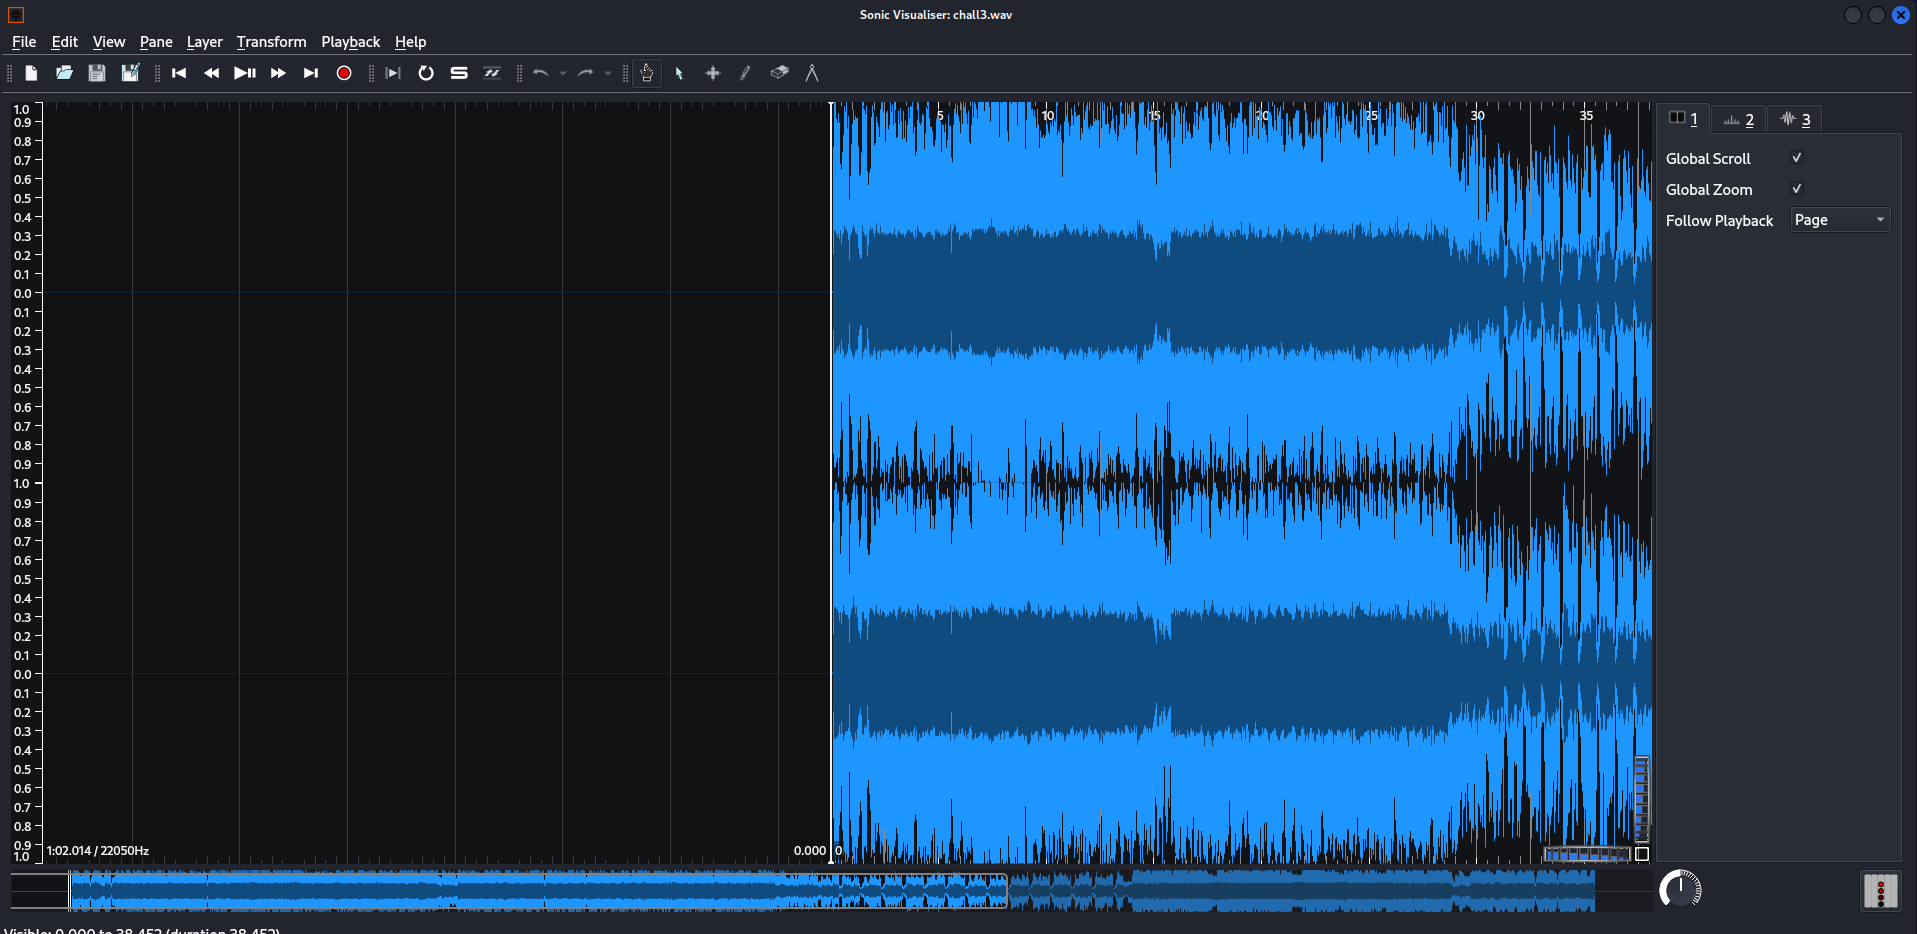
Next, we apply Spectrogram onto the audio waves. 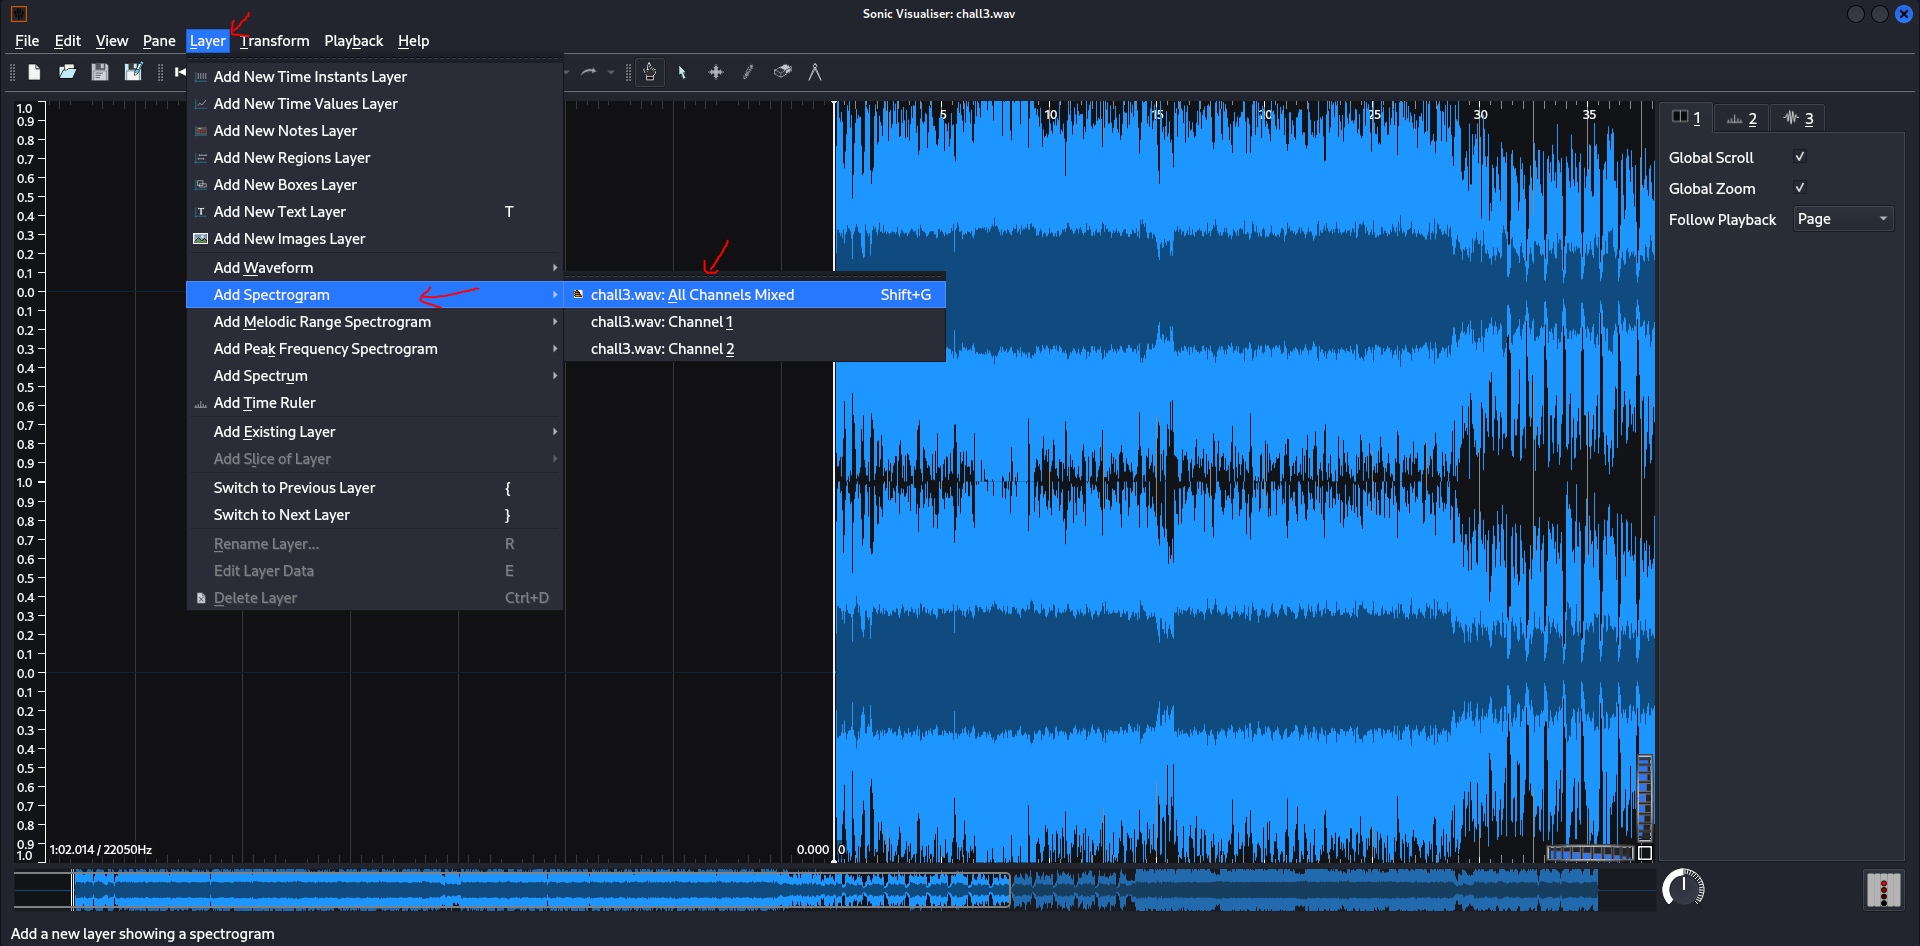
Now we can see the hidden message in the waves. Zoom in and read the message. 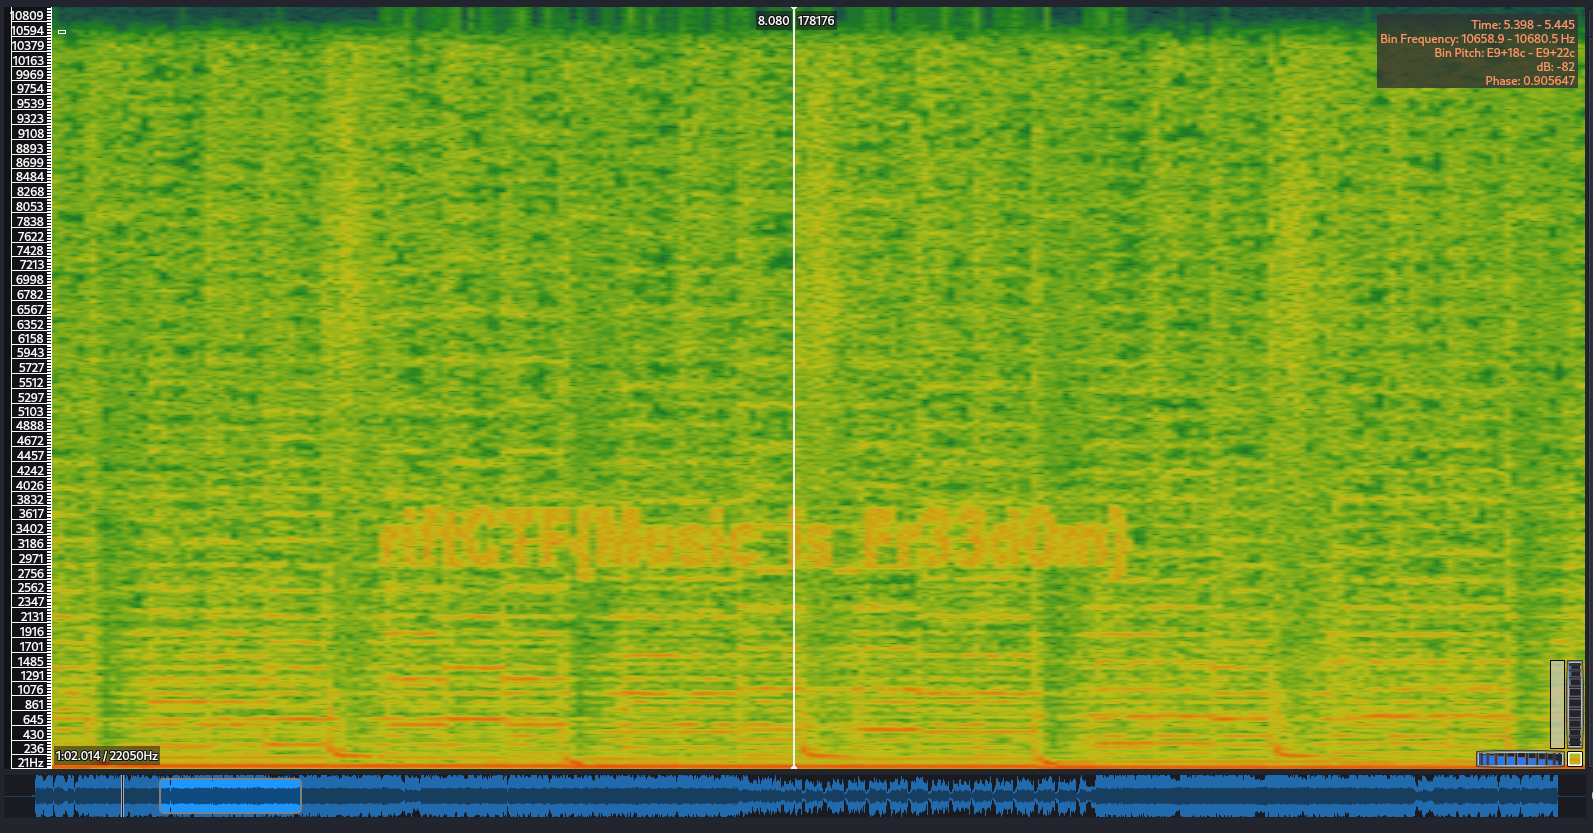
5. VBA Macros
Oletools
In case you have not installed it:
1
sudo -H pip install -U oletools[full]
Full documentation here.
VBA (Visual Basic for Applications) macros are scripts embedded in Microsoft Office documents (like Word, Excel, and PowerPoint) that can automate tasks but can also be used to carry out malicious activities. In CTF, you may encounter documents containing hidden or obfuscated VBA macros, and your task is to analyze these macros to uncover hidden information or understand the malicious behavior.
olevba is a tool for analyzing VBA macros embedded in Office documents. It is part of the oletools suite, which provides various tools for analyzing OLE and OOXML files but commonly used in Office documents.
Hint: When you see docm file, it means that it is a macro-enabled file.
Example of the tool usage:
1
olevba <filename>
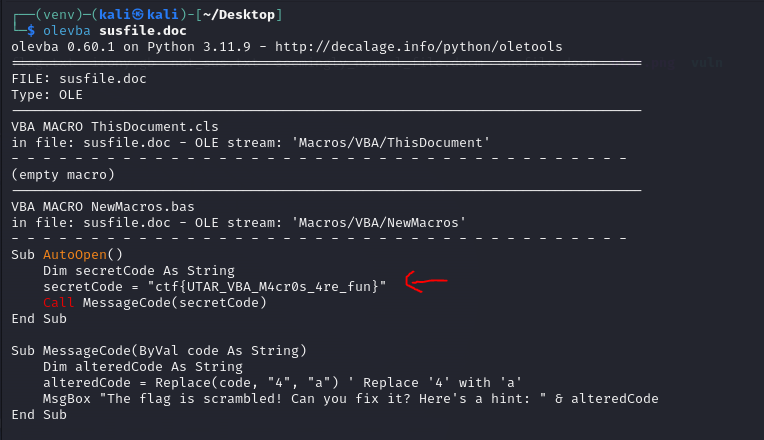
Based on the image above, we can see the secret code in the word document.
Tips and Tricks
1) If you do not understand what kind of file is it, for example, an .ad1 file, you can look it up on Google and type .ad1 file ctf writeup.
2) If one tool does not work, try other tools.
3) This category is basically analyzing and using the right tool to solve the challenges.
4) Sometimes, you do need to write scripts to solve the challenges like combining 1000 puzzle pieces to form a picture to read the flag. But of course, the faster way is to let ChatGPT to write it for you. It’d be better if you write the code yourself so that you know how to code it and learn more.